
To install your dash cam wire with a professional finish, plan a route that avoids obstructing your view. Use trim removal tools to tuck the cable beneath panels and along existing wiring, securing it with zip ties to prevent tangling. Confirm the wiring avoids airbag regions and sharp edges. Leave slack for rear camera movement. Finally, check all connections for stability and functionality. There’s more to reflect on for ideal installation and maintenance.
Essential Tools for Dash Cam Installation
When installing a dash cam, you’ll need a few essential tools to guarantee a smooth process. Start with a high-endurance microSD card for reliable recording. If you’re opting for a hardwired setup, a hardwiring kit and fuse tap are vital for connecting directly to your vehicle’s power supply. These tools help you avoid cluttered cables while ensuring a steady power source. A trim removal tool is indispensable for accessing wiring channels without damaging your vehicle’s interior. It allows you to route the power cable seamlessly. Additionally, having zip ties handy will help you secure and manage any excess wiring, promoting a clean installation. If your installation involves connecting to the fuse box, you may also need pliers or a socket wrench to facilitate the process. With these tools at your disposal, you’ll streamline your dash cam installation and enhance your driving experience.
[Products Worth Considering]

【Wide Compatible】Input:12V-24V; Output:5V/2A. With Type-C ports, this hardwire kit compatible with all of dash cams.

【Input 12–24V, Output 5V/2A】The Hardwire Kit provides a direct connection from your dash cam to the vehicle's fuse box (cars, trucks, buses, SUVs, etc.) for uninterrupted power supply. Designed for compatibility with 12–24V automotive systems, this kit ensures a reliable 5V/2A output.

【Compatible for ROVE R2-4K with USB-C Port, R2-4K PRO, R2-4K DUAL, R2-4K DUAL PRO, and R3 Dash Cam with USB Type C】 This dash cam hardwire kit is specially designed for R2, R2-PRO, R2-DUAL, R2-4K DUAL PRO and R3 dash cams to be used for 24-hours parking monitor.
Step-by-Step Guide to Wiring Your Dash Cam
To wire your dash cam, start by gathering essential tools like a hardwiring kit, pliers, and electrical tape. Next, focus on proper wiring routing techniques to guarantee safety and functionality by avoiding airbag areas and sharp edges. With the right tools and a clear plan, you’ll achieve a reliable installation that enhances your driving experience.
Tools Required For Installation
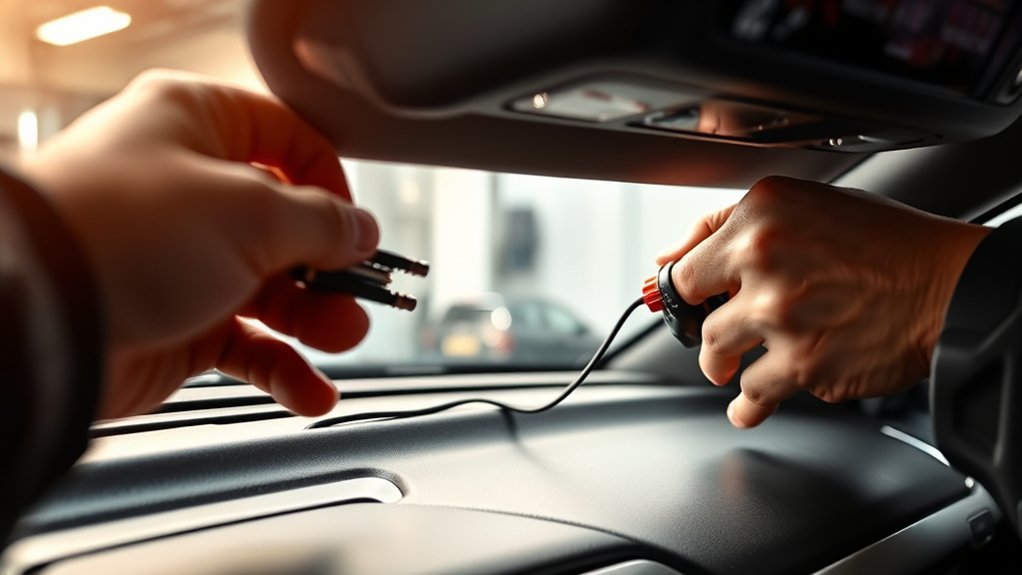
Installing a dash cam requires specific tools to guarantee a smooth and efficient process. To successfully tackle hardwiring a dash cam, gather the following essential items:
- Hardwire kit
- Pliers
- Socket wrench
- Trim removal tools
Additionally, a high-endurance microSD card is vital for peak performance. Be sure to consult your vehicle’s manual to locate the fuse box, as it’s typically under the steering wheel, glove box, or footwell. When connecting the hardwire kit, connect the red wire to a constant power source and the yellow wire to an ignition-switched power source, using add-a-fuses for a professional finish. Always double-check your connections and test the dash cam’s functionality before securing all wiring to verify everything works correctly.
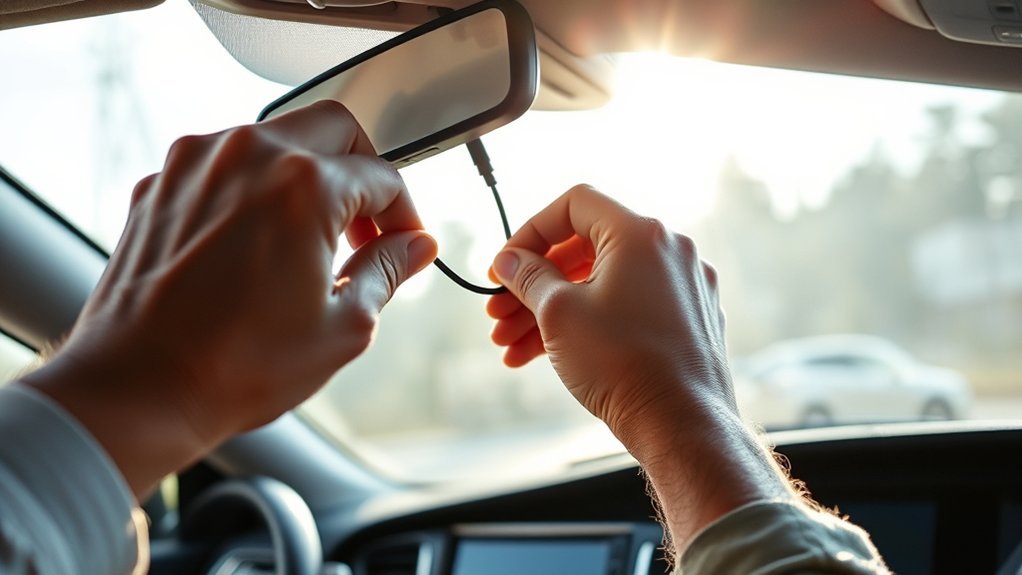
Wiring Routing Techniques
A successful dash cam installation relies heavily on effective wiring routing techniques that prioritize safety and aesthetics. Start by choosing a wiring path that avoids airbag modules and sharp edges. Use your vehicle’s roof lining to conceal wiring, routing it from the dash cam to the fuse box for a clean look. Securely attach the wires with zip ties to prevent dangling cables. Make certain to leave sufficient slack in the rear camera wire to accommodate boot movement, preventing strain on connections. Carefully follow your vehicle’s user manual to locate the fuse box and select appropriate fuse slots using fuse taps for constant and ignition-switched power. This method will guarantee you effectively power your dash cam while maintaining a professional finish.
What Not to Do When Wiring Your Dash Cam
When wiring your dash cam, it’s crucial to steer clear of common mistakes that can compromise both functionality and safety. Follow these guidelines to guarantee a professional finish:
- Don’t cut factory wires: This can void your warranty. Use a fuse tap for safe connections instead.
- Avoid routing near airbags: Placing wires close to airbag modules or sharp edges can lead to wear and potential malfunction.
- Secure the ground wire: Verify it connects firmly to a metal ground bolt; a poor ground connection can disrupt your dash cam’s power source.
- Refrain from excess slack: Leaving too much wire can obstruct vehicle operation and interfere with safety features.
Lastly, never skip testing your dash cam after installation. Confirm that all connections are functioning correctly before finalizing your setup. By avoiding these pitfalls, you’ll ensure that your dash cam operates smoothly and safely.
Best Practices for Securing and Concealing Dash Cam Wires
To achieve a clean installation, use trim panels effectively by tucking the dash cam wires behind them, which hides the cables and improves aesthetics. Secure any excess wiring with zip ties to prevent tangling and guarantee they don’t interfere with vehicle controls. Following these practices not only enhances the visual appeal but also maintains the safety and integrity of your vehicle’s electrical system.
[Products Worth Considering]

This product is a special pressure drop line for driving data recorder.Through the step-down function of 12-24V voltage step-down output 5V1-3A current,power supply to the recorder.

【Type-C Port MINI(ATS) Hardwire Kit】11.5ft Type-C hardwire kit for dash cam or other device powered by Type-C USB port, 5V/2A steady output, voltage input supports from 12V-24V. NOTE: The hardwire kit is not suitable for D100.
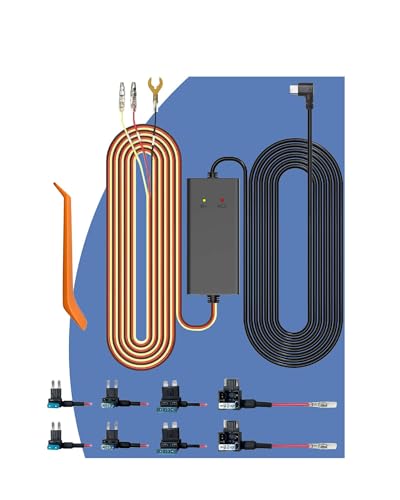
Dash Cam Hardwire Kit: Smart ACC detection automatically switches between driving mode and parking mode. A simple and reliable power solution for USB-C dash cameras.
Use Trim Panels Effectively
Using trim panels effectively is crucial for installing a dash cam cleanly and securely. Start by carefully removing the trim panels with a trim removal tool to access areas for routing wires. Always conceal the wiring behind trim panels and alongside the headliner to keep a professional appearance. Here are some best practices:
- Route wires without obstructing the driver’s view.
- Secure wiring tightly using zip ties or adhesive clips to prevent rattling.
- Avoid airbag modules to guarantee proper deployment in emergencies.
- Reattach trim panels securely, ensuring no wires are pinched or exposed.
Following these steps will not only enhance your dash cam installation but also maintain safety and functionality in your vehicle.
Secure Wires With Zip Ties
Secure wires with zip ties to create a tidy and professional dash cam installation. Start by bundling any excess wire lengths to prevent tangling, ensuring a clean appearance. Position zip ties every 6 to 12 inches along the routing, keeping the wires secure and minimizing movement while driving. When cutting the zip ties, leave a small tail to avoid sharp edges that could damage the wires over time. For added security, consider using zip tie mounts or adhesive clips to anchor the wires to surfaces, enhancing concealment. Remember not to over-tighten the zip ties, as this can compromise wire insulation and lead to electrical issues. With these steps, you can effectively install a dash while maintaining a polished look.
How to Troubleshoot Dash Cam Wiring Issues
When troubleshooting dash cam wiring issues, it is crucial to start by ensuring a solid ground connection, as a poor ground can lead to power failures and erratic performance. Here are some key steps to follow:
Ensure a solid ground connection when troubleshooting dash cam wiring to prevent power failures and erratic performance.
- Verify the orientation of the accessory and ignition wires; incorrect wiring can prevent your dash cam from powering on.
- Use a circuit tester to confirm that you’re tapping the correct fuses for constant power and switched power; wrong fuses can cause electrical failures.
- Check for loose connections; they can interrupt the power supply and lead to reboot loops or malfunction.
- Regularly inspect your wiring for signs of wear or damage, especially at sharp edges, to avoid short circuits.
[Products Worth Considering]

【Low Voltage Protection】 Once the input voltage drops below 11.6V (23.2V for 24V input), the battery drain protection will cut off the power supply, leaving enough power to ignite the engine without damaging the battery.

DUAL-SLOT FUSE HOLDER: The dual-slot fuse jumper connector provides two fuse holders, one fuse holder to protect existing circuits and the second fuse holder to protect new circuits, making it safe and reliable to use in daily life

Dual-slot Fuse Holder: Provides 1 fuse holder to protect existing circuits and a second fuse holder to protect new circuit. Blue flexible socket tail, very easy to connect to any naked wires by only use a vise
How to Test Dash Cam Functionality?
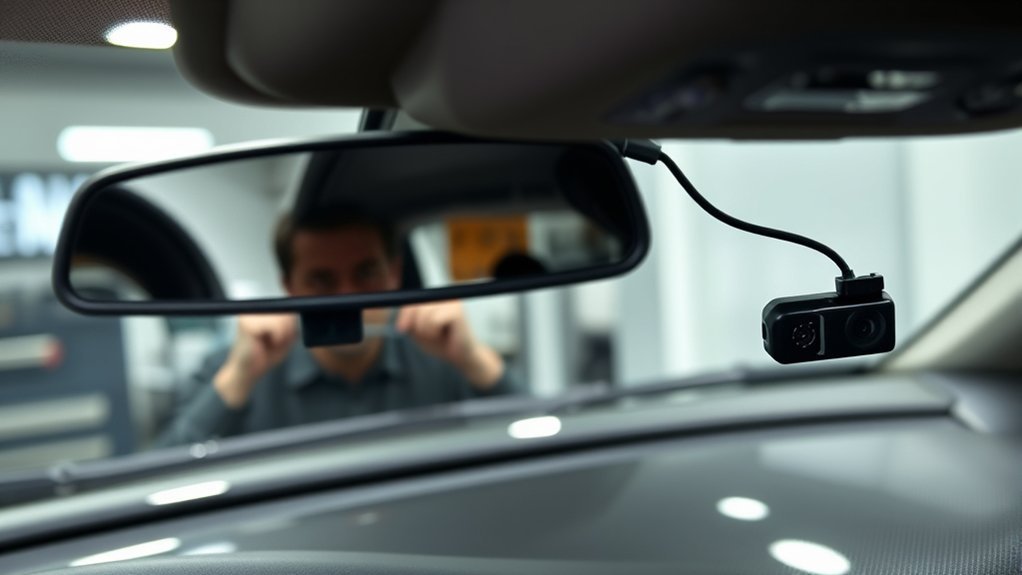
To guarantee your dash cam is functioning properly after installation, start by powering on the device as soon as you start your vehicle. If it powers on, your installation was successful. Next, use the dash cam’s built-in screen or a smartphone app to adjust the camera angle, ensuring it captures the ideal field of view for quality recording. Make sure you’ve inserted a compatible microSD card, preferably a high-endurance one, as it’s essential for recording functionality.
Conduct a test recording by driving for a short distance. Review the footage to confirm the video quality meets your expectations and that the camera operates correctly. Finally, to verify parking mode functionality, turn off the ignition and observe if the dash cam continues to record upon detecting motion or impact. This confirms that your dash camera is ready for action, safeguarding your vehicle while you’re away.
Frequently Asked Questions
How to Hide the Wires for a Dash Cam?
To hide dash cam wires, use effective wire management techniques. Choose compatible dash cam accessories and select appropriate power source options, ensuring you consider vehicle compatibility for a clean, professional look without compromising safety.
How to Get a Dash Cam Professionally Installed?
To get your dash cam professionally installed, research installers’ reviews, compare costs, and verify they use quality tools. Check for warranties and ask about dash cam features to secure peak performance and satisfaction.
Does Hardwiring a Dash Cam Void Insurance?
Hardwiring a dash cam typically doesn’t void your insurance. However, review your insurance policy implications, as modifications may affect claims. Benefits include improved evidence during disputes, enhancing your dash cam’s legality and effectiveness in claim procedures.
Is It Better to Hard Wire a Dash Cam?
Yes, hardwiring a dash cam offers significant benefits, enhancing dash cam safety and providing reliable power source options. While installation challenges exist, the advantages of continuous operation and a cleaner setup often outweigh the difficulties.
Conclusion
To summarize, installing your dash cam with precision not only enhances its functionality but also gives your vehicle a polished look. By following the outlined steps and best practices, you’ll guarantee a professional finish that stands the test of time. Remember, a well-wired dash cam is like a well-tuned engine—essential for a smooth ride. If you encounter issues, don’t hesitate to troubleshoot, ensuring that every connection is secure and every view is crystal clear.


Leave a Reply