

To wire your dash cam safely, start by using a high-quality hardwiring kit to connect directly to the vehicle’s fuse box for reliable power and parking mode support. Identify the right fuse types using a multimeter, ensuring they’re rated between 10A to 30A. Avoid critical safety fuses, and utilize add-a-fuses to maintain factory integrity. After installation, test functionality by confirming power and recording accuracy, which helps prevent issues down the line. Exploring installation tips can enhance your setup further.
Why Hardwiring Your Dash Cam Matters
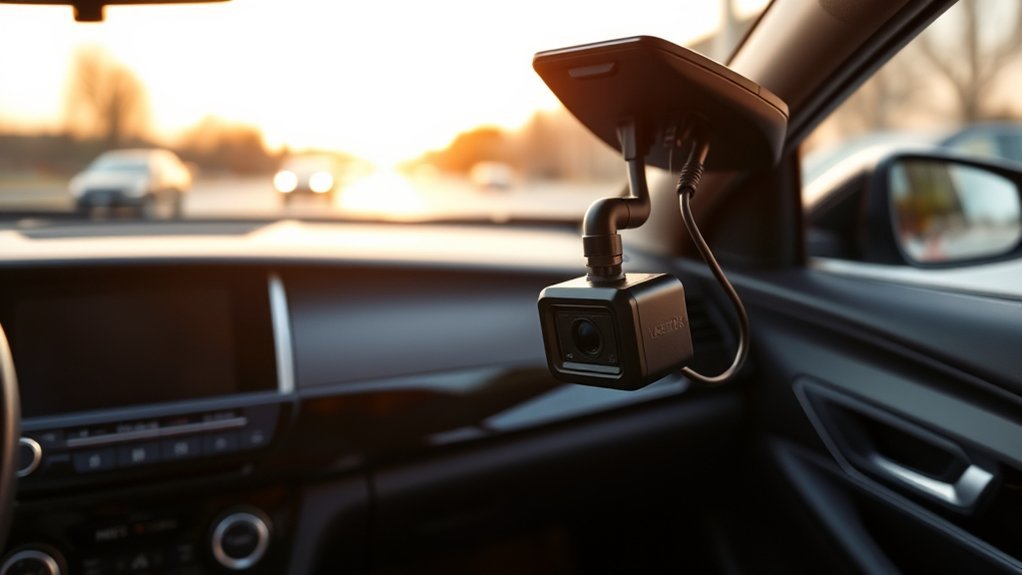
When you hardwire your dash cam, you guarantee a consistent and reliable power source directly from your vehicle’s fuse box, which is vital for uninterrupted operation. This method not only provides constant power but also enables parking mode, allowing your dash cam to record while your vehicle is parked and turned off. You’ll capture significant video evidence of any incidents that occur, safeguarding your interests without relying on the vehicle’s battery.
Additionally, hardwiring creates a cleaner look by eliminating dangling cables that could obstruct your view or distract you while driving. By connecting to constant and ignition-switched power fuses, your dash cam automatically powers on with the ignition, reducing wear on lighter sockets and preventing malfunctions. Overall, hardwiring a dash cam enhances functionality and reliability, ensuring you’re always prepared to document what happens on the road.
Tools You Need for a Successful Installation
To install your dash cam effectively, you’ll need a specific set of tools to guarantee a smooth process. Gather essential items like a dash cam, a microSD card, and a car power adapter, along with tools such as a fuse puller and trim removal tool. This checklist will help streamline your installation and maintain a professional finish.
[Products Worth Considering]

【Type-C Port MINI(ATS) Hardwire Kit】11.5ft Type-C hardwire kit for dash cam or other device powered by Type-C USB port, 5V/2A steady output, voltage input supports from 12V-24V. NOTE: The hardwire kit is not suitable for D100.

【Compatible for ROVE R2-4K with USB-C Port, R2-4K PRO, R2-4K DUAL, R2-4K DUAL PRO, and R3 Dash Cam with USB Type C】 This dash cam hardwire kit is specially designed for R2, R2-PRO, R2-DUAL, R2-4K DUAL PRO and R3 dash cams to be used for 24-hours parking monitor.

【Low Voltage Protection】 Once the input voltage drops below 11.6V (23.2V for 24V input), the battery drain protection will cut off the power supply, leaving enough power to ignite the engine without damaging the battery.
Essential Tools Checklist
Installing a dash cam requires specific tools to guarantee a seamless and efficient process. Your essential tools checklist begins with a high-quality hardwiring kit, such as the TYPE S Hardwiring Kit, and a microSD card for video storage. You’ll also need a fuse puller or needle-nose pliers to safely extract fuses from the fuse box. A multimeter is vital for verifying fuse types and functionality, ensuring correct power connections. To manage wires without damaging your vehicle, a plastic trim removal tool is important. Finally, prepare cable clips or adhesive mounts to secure and organize your wiring, keeping distractions at bay and achieving a clean installation. By gathering these tools, you’ll set yourself up for success.
Recommended Equipment Types
A successful dash cam installation hinges on having the right equipment types, ensuring you can connect your device safely and efficiently. Start with a fuse tap hardwiring kit, like the TYPE S Hardwiring Kit, to link your dash cam to the vehicle’s fuse box. Utilize tools like a fuse puller or needle-nose pliers for easy fuse removal during the installation process. A multimeter will help you verify fuse types and power connections, preventing costly mistakes. Don’t forget plastic trim removal tools; they protect your vehicle’s interior while you tuck away wires. Finally, secure and organize cables with zip ties or adhesive mounts to eliminate distractions while driving.
Choosing the Right Fuse for a Successful Dash Cam Installation
Choosing the right fuse for your dash cam installation is essential for guaranteeing both functionality and safety. Follow these steps to make an informed choice:
- Identify Fuse Types: Use a circuit tester to determine constant and ignition-switched fuses.
- Consult Vehicle’s Owner’s Manual: This helps you avoid critical safety fuses that could impact your car’s essential functions.
- Check Fuse Ratings: Dash cams typically require fuses rated between 10A and 30A, while battery packs need 20A to 30A to meet power demands.
- Utilize Add-a-Fuses: This method allows you to connect your dash cam without cutting factory wires, preserving your vehicle’s integrity.
Select a fuse slot that’s easily accessible and close to your installation site, simplifying the wiring process and minimizing clutter. By choosing the right fuse, you guarantee that your dash cam operates efficiently and safely.
[Products Worth Considering]

DUAL-SLOT FUSE HOLDER: The dual-slot fuse jumper connector provides two fuse holders, one fuse holder to protect existing circuits and the second fuse holder to protect new circuits, making it safe and reliable to use in daily life

UNIVERSAL COMPATIBILITY: Our fuse tap adapters are designed to fit most vehicles with Micro3 ATL blade-style fuses. Made from high-quality materials, these adapters offer excellent electrical conductivity and heat resistance. Each tap provides two fuse holders – one to protect the existing circuit and another for your new accessory, ensuring safe and reliable power distribution

Package Contents: 1 x Type-C cable Hardwire Kit (ACC signal connected to B8), 8 x Fuse tap connectors, 1 x Short Type-C conversion cable (ACC signal on B5), 1 x installing crowbar, 1 x Fuses Clip, 1 x Installation instructions, dash cam hardwire with the most popular fuse types will meet the applications for most car models
Step-by-Step Guide to Hardwiring Your Dash Cam
Hardwiring your dash cam can enhance its functionality and guarantee continuous recording without the hassle of battery drain. Start by gathering your tools: a hardwiring kit, fuse puller, and electrical tape. Locate your vehicle’s fuse box, usually under the steering wheel or in the glove box; refer to your owner’s manual for specifics. Identify suitable fuse slots—choose a constant power fuse for uninterrupted recording and an ignition-switched fuse for recording only when the vehicle is on, with ratings between 10A and 30A.
Connect the hardwiring kit to the selected fuses using add-a-fuses: red for constant power and yellow for ACC. Securely ground the black wire to a metal bolt. Once connected, plug the power cable into the dash cam. Start your vehicle to check functionality, and use zip ties to organize any loose wiring. This method guarantees peace of mind with a clean, efficient installation.
Common Mistakes to Avoid When Hardwiring
While hardwiring a dash cam is a straightforward process, several common mistakes can undermine its effectiveness. To guarantee you power your dash cam properly, keep these pitfalls in mind:
- Incorrect Wire Orientation: Always verify the orientation of the accessory (ACC) and ignition wires to prevent malfunctioning or battery drain.
- Neglecting Ground Wire Connections: Double-check your ground connections; loose or bad connections can disrupt power supply.
- Selecting Critical Safety Fuses: Avoid selecting critical safety fuses. This can disrupt essential vehicle functions, so consult your vehicle’s owner manual.
- Forgetting to Test: Use a multimeter to verify voltage in your chosen fuse slots. This helps prevent installation errors.
Lastly, always secure connections with electrical tape or zip ties to avoid loose wiring. By steering clear of these mistakes, you’ll guarantee a reliable and efficient dash cam installation.
Alternative Power Options for Dash Cams
When considering power options for your dash cam, it’s essential to understand the various methods available to guarantee peak functionality. A Lighter Socket Connection offers a plug-and-play setup, but it occupies the socket and lacks support for parking mode. Alternatively, USB Port Usage allows for parking mode features but may conflict with other devices, requiring manual unplugging. For a more robust solution, Hardwiring to Fuse Box provides continuous power, enabling features like parking mode recording while keeping your installation clean and cable-free. However, be cautious of potential battery drain if not installed correctly. Finally, an External Battery Pack provides portability and ease of installation, though it requires periodic charging to maintain functionality. When selecting a power source, consider the length of your commutes, as shorter drives might not sufficiently charge a battery pack. Each option has its pros and cons, so choose the one that best fits your needs.
[Products Worth Considering]

【24 Hours Parking Surveillance】When the engine is off, HK4 hardwire kit provides continuous power to the camera, any collisions, event will be recorded.

【Wide Compatible】Input:12V-24V; Output:5V/2A. With Type-C ports, this hardwire kit compatible with all of dash cams.

【Compatible 12–24V Vehicles】This hardwire kit dash cam connects the camera directly to the car, truck, bus, SUVs, or big rig for continuous power, accepts voltage from any type of vehicles runs on 12–24V.
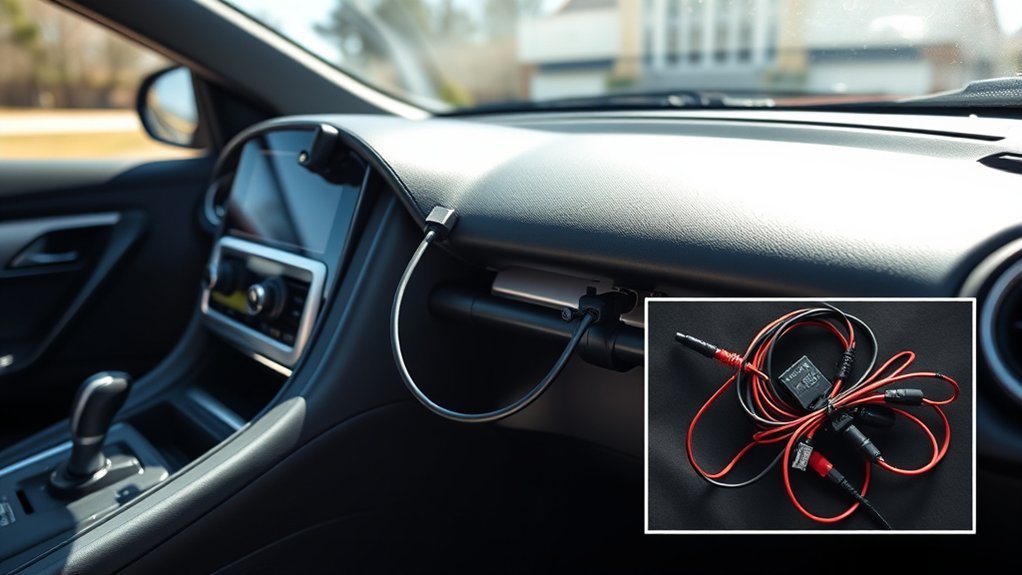
Tips for a Clean and Safe Dash Cam Installation
To guarantee a clean and safe dash cam installation, start by using a hardwiring kit that connects directly to your vehicle’s fuse box. This method avoids messy cables and guarantees secure connections. Follow these tips for ideal installation:
Ensure a clean dash cam installation with a hardwiring kit for secure connections and minimal clutter.
- Routing Wires: Tuck wires along the vehicle’s trim, steering clear of airbag deployment zones to enhance safety.
- Mounting Position: Place the dash cam behind the rearview mirror for ideal visibility, ensuring it doesn’t obstruct your line of sight.
- Securing Loose Wiring: Use zip ties or adhesive mounts to keep loose wires tidy, minimizing distractions while driving.
- Regular Checks: Frequently inspect all connections for security and correctness to prevent issues like battery drain or malfunctions.
Testing Your Dash Cam After Installation

After installing your dash cam, it’s vital to test its functionality to guarantee everything is working as intended. Start by plugging the power cable into the dash cam and turning on the vehicle ignition. Confirm that the dash cam powers up correctly and verify it powers off automatically with the ignition. This step verifies your installation is functioning properly.
Next, test the parking mode by leaving the vehicle off and checking if the dash cam continues to record when motion is detected. This feature is important for security when parked. Adjust the dash cam’s angle to capture the desired field of view, using its screen or smartphone app for accuracy.
Finally, monitor the dash cam’s performance for any unusual behavior, such as failure to power on or erratic recording. These issues could indicate wiring problems or poor connections that need immediate attention.
Keep Your Dash Cam Running Smoothly
To keep your dash cam running smoothly, perform regular maintenance checks to verify all components are functioning correctly. Monitor the health of your power source, especially if you’ve hardwired the device, to prevent issues like battery drain. By staying proactive, you can enhance the reliability of your dash cam and maintain peak recording performance.
Regular Maintenance Checks
While you may think that once your dash cam is installed, it requires little attention, regular maintenance checks are essential to confirm it operates at peak performance. Here’s how you can keep your dash cam in top shape:
- Regularly clean the camera lens and windshield to prevent blurry footage.
- Reformat the microSD card every few months to avoid data errors.
- Check for firmware updates from the manufacturer to get the latest features.
- Conduct visual inspections of all connections and wiring to ascertain there are no loose or faulty connections.
Additionally, test the dash cam’s functionality every few weeks, including parking mode and recording capabilities. By following these steps, you’ll guarantee reliable performance and clear recordings when you need them most.
Monitor Power Source Health
Maintaining your dash cam isn’t just about keeping the lens clean and ensuring the software is up to date; it’s equally important to monitor the health of its power source. Regularly check your vehicle’s battery, as a weak battery can cause insufficient power, leading to malfunction. Use a multimeter to test the voltage, ensuring it consistently provides 12V for peak performance. Keep an eye on the hardwiring connections; loose or corroded connections can result in intermittent power loss. If you’re using an external battery pack, charge it regularly to prevent depletion. Consider installing a power management kit when hardwiring, as it helps regulate power, prevents battery drain, and keeps your dash cam running smoothly during parking mode.
Fixing Common Dash Cam Problems
Although dash cams are designed for reliability, you may encounter common issues that can impact their performance. Here’s how to tackle them effectively:
- Check and Secure Connections: Regularly inspect your wiring. Poor connections can prevent your camera from powering on.
- Memory Card Maintenance: Reformat your memory card periodically to avoid data errors. Corrupted files can result in lost footage.
- Firmware Updates: If your dash cam isn’t saving files, check the manufacturer’s website for firmware updates. Outdated software can cause functionality issues.
- Prevent Battery Drain: Use hardwire kits with power management features to prevent battery depletion when parked for long periods.
Frequently Asked Questions
Is It Better to Hardwire a Dash Cam or Cigarette Lighter?
Hardwiring your dash cam offers significant benefits, like improved power management and enhanced battery longevity, while cigarette lighter drawbacks include installation complexity and potential disconnection. Choose hardwiring for a reliable, clutter-free solution.
Where to Connect Dash Cam Power?
For dash cam installation, connect to the fuse box for reliable power source options. Prioritize battery voltage considerations, ensuring safety precautions are followed. This connection transforms your driving experience into a monitoring powerhouse, enhancing safety on the road.
Is Hardwiring a Dashcam Bad for the Battery?
Hardwiring a dash cam can negatively impact battery health if installation precautions aren’t taken, potentially leading to electrical drain and compromising the dash cam lifespan. Verify you check your vehicle warranty before proceeding with hardwiring.
How to Hide Power Cable for Dash Cam?
To hide your dash cam’s power cable, focus on meticulous cable routing along the dashboard and A-pillar. Use professional tips for a concealed installation, ensuring clean aesthetics while considering your vehicle’s compatibility for a seamless look.
Conclusion
In the end, hardwiring your dash cam is like weaving a safety net beneath your driving experience. With the right tools and techniques, you’re not just installing a device; you’re fortifying your vehicle against unexpected moments. By following best practices and avoiding common pitfalls, you guarantee that your dash cam captures every journey with clarity and reliability. Remember, a well-installed dash cam is your silent guardian, always watching, ready to document life’s unpredictable turns.


Leave a Reply