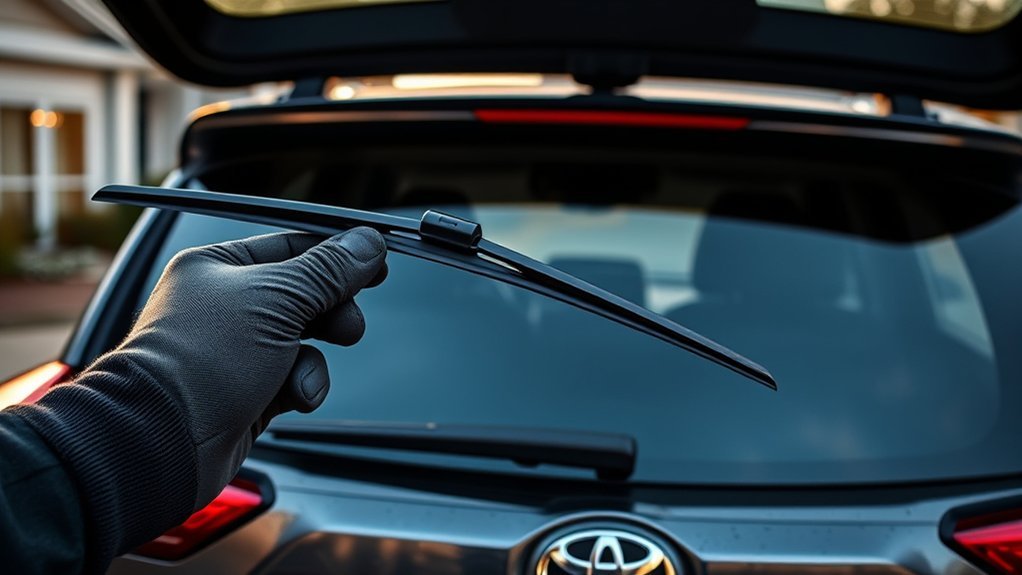
To replace the rear wiper blade on your Toyota RAV4, start by pulling apart the tabs on the plastic housing and lifting the wiper arm. Bend the wiper slightly to pop it out of the joint and remove it at an angle. Next, take your new blade, remove its protective sleeve, and insert it with the thick side facing up. Confirm it’s secure and test its functionality. For detailed installation tips and maintenance advice, continue exploring the process.
The Importance of Rear Wiper Blade Maintenance

When you neglect the maintenance of your rear wiper blade, you compromise your visibility during critical driving conditions. Regular rear wiper blade maintenance is crucial for guaranteeing peak performance, especially in adverse weather like rain or snow. Worn-out blades can create streaks on your windshield, severely impairing your ability to see clearly. Over time, the rubber deteriorates, leading to a risk of the blade breaking apart, which exacerbates visibility issues. Conducting routine checks on your wiper blades allows you to detect wear early, preventing accidents caused by reduced visibility. Timely replacement not only enhances your safety but also guarantees that your rear windshield remains clear when you need it most. Don’t underestimate the power of effective maintenance.
Tools You’ll Need for the Replacement
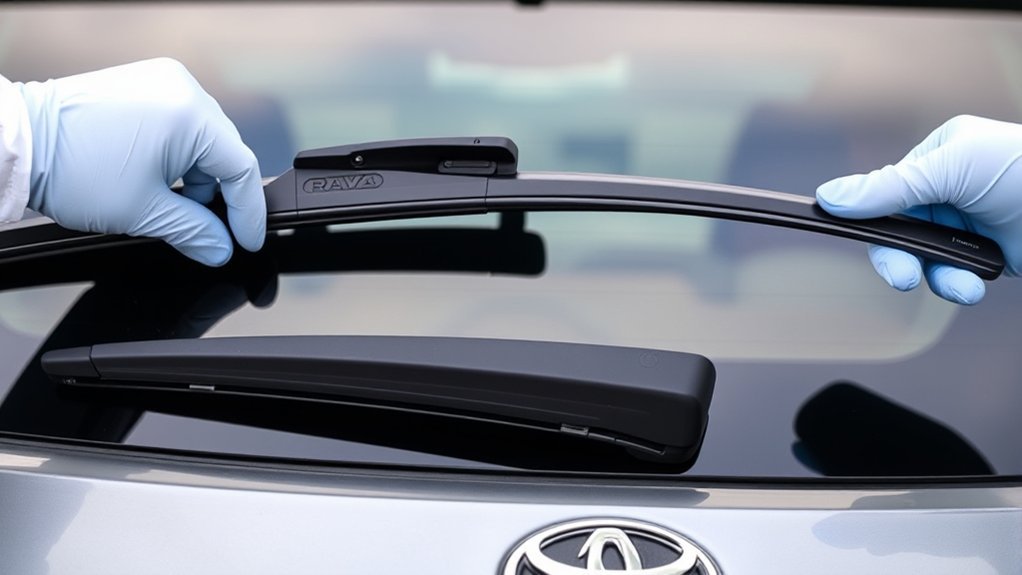
Maintaining your rear wiper blade is only part of the process; having the right tools for the replacement is equally important. First, you’ll need a new rear wiper blade, such as the AutoBoo brand, which guarantees ideal compatibility with your Toyota RAV. A protective sleeve for the new one is vital to prevent damage during installation. While you typically won’t need special tools, a flathead screwdriver can be handy for maneuvering the wiper assembly. Don’t forget cleaning supplies—glass cleaner and a microfiber cloth will maintain your windshield’s clarity, enhancing wiper performance. Familiarizing yourself with the wiper assembly mechanism is essential for a smooth replacement. Thanks for watching, and good luck with your project!
How to Remove Your Rear Wiper Blade
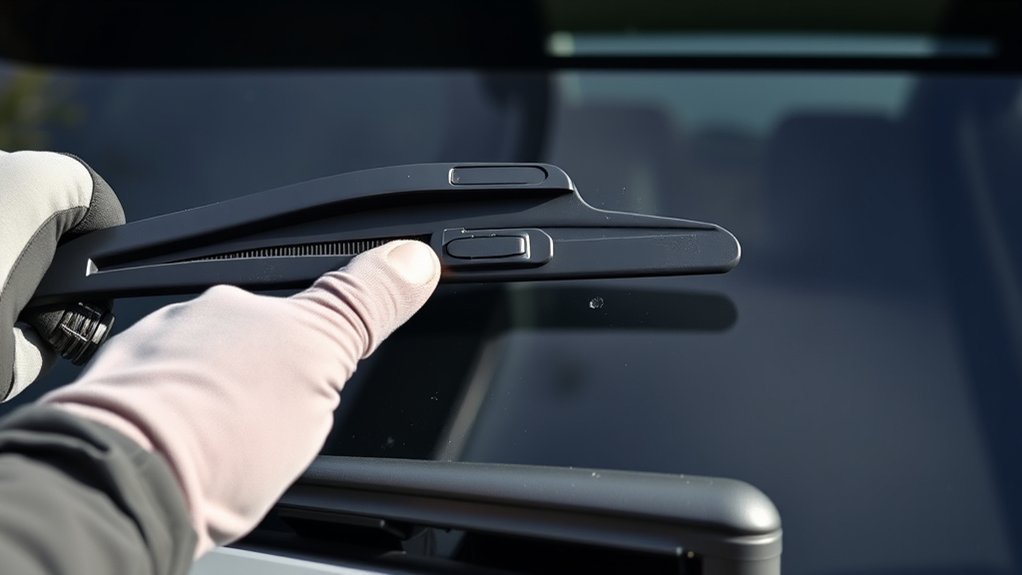
To remove your rear wiper blade on a Toyota RAV4, start by pulling apart the two tabs on the plastic housing that secures the blade. Next, slip the entire wiper arm assembly upwards to gain access. Follow these steps for effective removal:
- Bend the wiper slightly to pop it out of the swivel joint.
- Pull the wiper blade straight out at an angle, ensuring you don’t damage the arm.
- Familiarize yourself with different wiper blade types for future replacements.
- Apply proper installation techniques and maintenance tips to enhance performance.
Inspecting the Old Wiper Blade for Damage
Before replacing your rear wiper blade, carefully inspect the old one for surface cracks that indicate deterioration. Check the rubber integrity to guarantee it’s not hard or brittle, as this affects its ability to wipe effectively. Finally, assess the blade’s flexibility; a stiff or warped blade won’t conform properly to the windshield, compromising performance.
Check For Surface Cracks
A thorough inspection of your old rear wiper blade is crucial for ensuring ideal performance. Checking for surface cracks is essential to maintain wiper blade longevity and enhance windshield visibility. Here’s what to look for:
- Surface cracks: These can notably reduce effectiveness in clearing your windshield.
- Deterioration signs: Watch for fraying or missing rubber, which leads to streaks.
- Hardened areas: Brittle rubber indicates aging and poor performance in wet conditions.
- Irregular wear patterns: These suggest improper installation or damage needing attention.
Regularly checking for these issues as part of your seasonal maintenance tips can prevent sudden visibility problems while driving in inclement weather, ensuring a safer, clearer view ahead.
Inspect Rubber Integrity
Inspecting the rubber integrity of your old rear wiper blade is essential for maintaining ideal visibility while driving. Start by checking for signs of wear, such as cracks, tears, or hardened rubber—these issues can severely impact performance. Examine the rubber edge for fraying or missing pieces, as they can create streaks on your windshield. Don’t forget to look for debris or dirt buildup that might hinder proper contact with the glass. Remember, different wiper blade types utilize various wiper blade materials, which can affect durability. Leading wiper blade brands often offer high-quality options, so regular inspections every few months can guarantee safety and maximum visibility during inclement weather. Replace your blade promptly if you notice any damage.
Assess Blade Flexibility
Evaluating blade flexibility is essential for ensuring your rear wiper functions effectively. Inspect your old wiper blade closely to confirm its condition and performance. Pay attention to these key areas:
- Look for cracks, tears, or missing rubber sections that could compromise effectiveness.
- Gently bend the blade; if it feels stiff or brittle, consider replacing it.
- Check for any separation between the rubber and metal frame, which can hinder performance.
- Assess the rubber edge; if it’s frayed or lacks smoothness, it may leave streaks.
Regular assessments can greatly enhance your wiper blade lifespan and overall performance, ensuring clear visibility in adverse weather. Understanding wiper blade types helps you make informed decisions for ideal maintenance and replacement.
Steps to Install Your New Wiper Blade
Start by removing the protective sleeve from your new wiper blade to guarantee it functions correctly. Next, identify the thick side of the blade; this should face upward when you insert it into the wiper arm assembly. Angle the blade as you insert it into the groove of the wiper arm, verifying it aligns properly for a secure fit. Once positioned, turn the blade down to flatten it against the windshield, maximizing contact for peak performance. Finally, click the housing of the wiper arm back into place, securing the installation. By addressing common wiper problems through careful installation and choosing quality wiper materials, you can enhance seasonal wiper care and guarantee lasting functionality.
Avoid These Common Installation Mistakes
When replacing your rear wiper blade, pay close attention to blade orientation and assembly steps. Incorrectly positioning the blade can hinder its performance, while failing to secure the housing may lead to detachment during use. Make certain you follow each step meticulously to guarantee peak function and safety.
Incorrect Blade Orientation
Proper installation of the rear wiper blade is essential, as even small mistakes can greatly affect its performance. To guarantee peak functionality, follow these blade alignment tips and wiper angle adjustments:
- Verify the thick side of the new wiper blade faces up to avoid poor performance.
- Insert the blade at a proper angle, confirming it clicks securely into place.
- Fully turn the blade down to align with the window, preventing improper scraping and streaks.
- Remove any protective sleeve from the new blade before installation to enhance its clearing effectiveness.
Neglecting Wiper Assembly Steps
Neglecting essential steps in the wiper assembly process can lead to frustrating results and potential damage to your vehicle. Here are some common installation mistakes to avoid:
| Mistake | Consequence | Solution |
|---|---|---|
| Ignoring the tabs on housing | Wiper arm assembly won’t detach properly | Pull apart the tabs carefully |
| Not bending the wiper | Difficulty removing the old blade | Bend to pop it out of the swivel |
| Forgetting the protective sleeve | Hindered performance of the new blade | Always remove the sleeve |
| Incorrect blade orientation | Ineffective wiping, possible damage | Install with thick side up |
| Failing to secure the housing | Wiper may detach during use | Click housing back into place |
Follow these installation tips and removal techniques for a successful replacement.
Test Your New Wiper Blade
After installing your new rear wiper blade, it’s essential to test its functionality to guarantee peak performance. This step is critical for confirming ideal wiper blade performance, so follow these guidelines:
- Activate the rear wiper and observe its smooth operation across the windshield.
- Watch for streaking or skipping, which may signal installation troubleshooting or a defective blade.
- Confirm the blade makes full contact with the glass for effective clearing of water and debris.
- If possible, test the wiper in various weather conditions to confirm reliability.
Regularly inspect your new blade for wear and tear, as even new blades can degrade over time. Implementing these seasonal maintenance tips will keep your rear wiper performing at its best.
Last-Minute Wiper Care Tips
While you may have just replaced your rear wiper blade, it’s essential to implement a few last-minute care tips to guarantee peak performance. Start with regular rear wiper maintenance; inspect the blade for cracks or tears that can hinder visibility. Seasonal wiper checks are vital—evaluate the wiper arm and mechanism for any obstructions or damage. To enhance effectiveness, perform wiper blade cleaning using appropriate supplies to minimize streaks on the windshield. Remember to test your new blade after installation on a clean surface, ensuring it clears water efficiently. By following these steps, you’ll maximize safety and visibility during adverse weather conditions, empowering your driving experience.
When to Replace Your Wiper Blade?
To guarantee your rear wiper blade functions effectively, it’s crucial to recognize when it needs replacement. Regular inspections can extend wiper blade longevity and enhance safety. Here are key performance indicators to watch for:
- Streaking on the windshield: Inadequate clearing means it’s time for a change.
- Squeaking sounds: This noise indicates rubber deterioration.
- Visible wear: Cracks or fraying on the blade signify it’s no longer effective.
- Ineffective clearing: If spots remain on the glass, your wiper blade needs replacement.
For peak performance, especially during rainy seasons, prioritize seasonal maintenance. Remember, using worn-out wiper blades compromises visibility and increases accident risks. Stay proactive to guarantee your rear wiper operates at peak efficiency.
Frequently Asked Questions
How Do You Change the Rear Wiper Blade on a Toyota RAV4?
To change your rear wiper blade on a Toyota RAV4, select the appropriate wiper blade types, follow maintenance tips, and consult buying guides for the best options. Verify proper installation for ideal performance and visibility.
Will Autozone Install Wiper Blades for Free?
Yes, AutoZone installs wiper blades for free when you purchase them. With various wiper blade types available, their trained staff offers quick installation tips, ensuring your blades fit perfectly and function effectively for ideal visibility.
Is It Easy to Change a Rear Wiper Blade?
Yes, changing a rear wiper blade is easy. Follow effective wiper maintenance tips, utilize a blade selection guide, and practice seasonal wiper care for ideal visibility and safety during all weather conditions.
How to Replace Rear Wiper Refill Toyota?
To replace the rear wiper refill, make certain you’ve got the correct wiper blade type, lift the arm, detach the old refill, and follow wiper installation tips to secure the new refill properly for effective rear wiper maintenance.
Conclusion
In summary, keeping your rear wiper blade in top shape is essential for safe driving, especially since studies show that nearly 90% of road accidents occur in rainy conditions. By regularly inspecting and replacing your wiper blades, you enhance visibility and guarantee a safer driving experience. Remember, a worn-out blade can negatively impact your view, making routine maintenance a smart choice. Stay proactive, and your Toyota RAV4 will thank you with clear rear visibility in all weather!