How to Hardwire a Dash Cam Safely
Last updated: May 31, 2026
What’s in This Article
- Why Hardwiring Your Dash Cam Is a Smart Choice
- Tools and Materials You’ll Need for Installation
- Step-by-Step Guide to Locating Your Vehicle’s Fuse Box
- Choose the Right Fuse for Your Dash Cam
- Connecting the Dash Cam Power Cable: A Detailed Process
- Routing Your Power Cable in the Car
- Grounding Your Dash Cam: Finding a Suitable Point
- Testing Your Dash Cam Installation for Optimal Performance
- Troubleshooting Hardwired Dash Cams
- When to Get Professional Help
- Frequently Asked Questions
Hardwiring your dash cam can feel risky if you have never opened a fuse box before. One wrong fuse choice can stop the camera from working, drain your battery, or affect a vehicle circuit you need. This guide shows you how to hardwire a dash cam with a cleaner cable route, safer fuse choice, and better support for parking mode.
Estimated total time: Plan for 45 to 90 minutes if you already have the right hardwire kit and tools.
Quick Answer
To hardwire a dash cam, connect a hardwire kit to your vehicle’s fuse box, route the cable behind trim, attach the ground wire to bare metal, and test the camera. Use a switched accessory fuse for driving power and a constant fuse only if your dash cam needs parking mode. Choose a kit with low-voltage cutoff to reduce battery drain risk.
Key Takeaways
- Use the fuse diagram in your owner’s manual before you choose any fuse slot.
- Pick a hardwire kit that matches your dash cam connector and vehicle voltage.
- Route the cable away from airbags, pedals, steering parts, and sharp trim edges.
- Use a solid chassis ground so the camera gets stable power.
- Test normal recording and parking mode before you tuck away the final wiring.
Why Hardwiring Your Dash Cam Is a Smart Choice

When you hardwire your dash cam, you give it a cleaner and more stable power path than a loose 12-volt plug. A hardwire kit can also unlock parking mode, which lets the camera monitor your car while it sits parked and turned off.
A hardwired setup also removes the long power cable from your dashboard. You can hide most of the cable behind the headliner, A-pillar trim, and lower dash panels. This gives your cabin a cleaner look and keeps the cable from blocking your view.
According to Garmin, a parking mode cable can connect a compatible dash cam to constant power so it can monitor incidents while your vehicle sits parked. Some hardwire kits also include low-voltage cutoff, which shuts off power before the starter battery gets too low.
Note: Parking mode is safest when your hardwire kit includes low-voltage cutoff and you set it for your vehicle’s battery condition.
If you do not feel comfortable working around vehicle wiring, choose a professional install. A skilled installer can help you avoid airbag paths, critical fuse circuits, and weak ground points.
Tools and Materials You’ll Need for Installation
Gather every tool before you start. This helps you avoid rushed choices inside the fuse box. You’ll need the dash cam, a compatible hardwire kit, fuse taps, and basic trim tools.
Check the connector type before you buy the kit. Some dash cams use USB-C, while others use mini USB, micro USB, or a brand-specific cable.
[Products Worth Considering]

【24 Hours Parking Surveillance】When the engine is off, HK4 hardwire kit provides continuous power to the camera, any collisions, event will be recorded.

【Compatible for ROVE R2-4K with USB-C Port, R2-4K PRO, R2-4K DUAL, R2-4K DUAL PRO, and R3 Dash Cam with USB Type C】 This dash cam hardwire kit is specially designed for R2, R2-PRO, R2-DUAL, R2-4K DUAL PRO and R3 dash cams to be used for 24-hours parking monitor.
![Dash Cam Hardwire Kit,[Upgraded Version] USB C Hardwire Kit for Dash Camera with 12V-24V to 5V Power Supply,Fuse Tap,Blade Fuses & Pry Tool,Protecting Car Dash Cam Front and Rear](https://m.media-amazon.com/images/I/41Lw3-pYLFL._SL500_.jpg)
24-Hour Full Day Monitoring:A dash cam that can stably record must have a set of step-down wires silently accompanying it! And our product is such a presence! It can provide 24-hour uninterrupted power supply for your dash cam. Even if the car stalls, it can still operate stably. Providing strong guarantees for maintaining the safety of your car and property
Essential Tools for a Safe Install
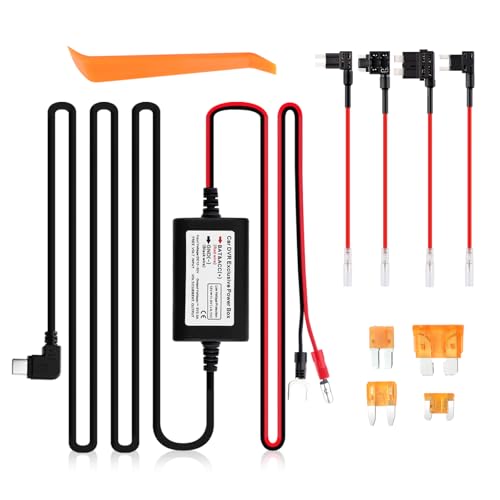
You need a hardwiring kit that matches your dash cam and vehicle power system. Most passenger vehicles use a 12-volt electrical system, but some trucks and commercial vehicles use 24 volts.
Use a fuse puller or needle-nose pliers to remove fuses safely. Use a multimeter or circuit tester to find constant and switched power. A trim removal tool helps you tuck wires without scratching panels.
Keep zip ties and electrical tape nearby. They help you secure loose wiring after you test the camera.
Required Wiring Parts
Your hardwire kit should include the power cable, a fuse tap, and the correct wire leads. Many kits use three wires: red for accessory power, yellow for constant battery power, and black for ground. Garmin’s parking mode wiring diagram lists black as ground, yellow as battery 12 V, and red as accessory 12 V.
You also need the correct fuse tap size for your fuse box. Common fuse types include ATO, mini, low-profile mini, Micro2, and Micro3. Do not force the wrong fuse tap into a slot.
Use an endurance-grade microSD card in the dash cam. Continuous recording and parking mode write data often, so a standard card may fail sooner.
Extra Accessories That Keep the Install Clean
The right accessories help you finish the job neatly. Keep these items on hand:
- Use a fuse tap to connect the dash cam to the fuse box without cutting factory wiring.
- Use a fuse puller or needle-nose pliers to remove fuses without damaging the fuse block.
- Use a trim removal tool to open panel edges without leaving marks.
- Use zip ties and electrical tape to secure wires and protect finished connections.
These small items can prevent loose wires, rattles, and messy routing.
Step-by-Step Guide to Locating Your Vehicle’s Fuse Box
Start with your owner’s manual because fuse box locations vary by vehicle. Many vehicles place an interior fuse box under the dashboard, near the driver’s side kick panel, or behind a small cover near the glove compartment.
Turn the vehicle off and remove the key before you open the fuse box. Keep the doors open only if you need access, because some vehicles wake up electrical circuits when a door opens.
| Location | Description |
|---|---|
| Driver’s Side | Often under the steering column or behind a side panel |
| Passenger’s Side | Often near the glove compartment or kick panel |
| Additional Boxes | Some vehicles also have fuse boxes under the hood or in the trunk |
Remove the fuse box cover and check the diagram. Avoid fuses for airbags, anti-lock brakes, stability control, power steering, engine control, or other safety systems.
Choose the Right Fuse for Your Dash Cam
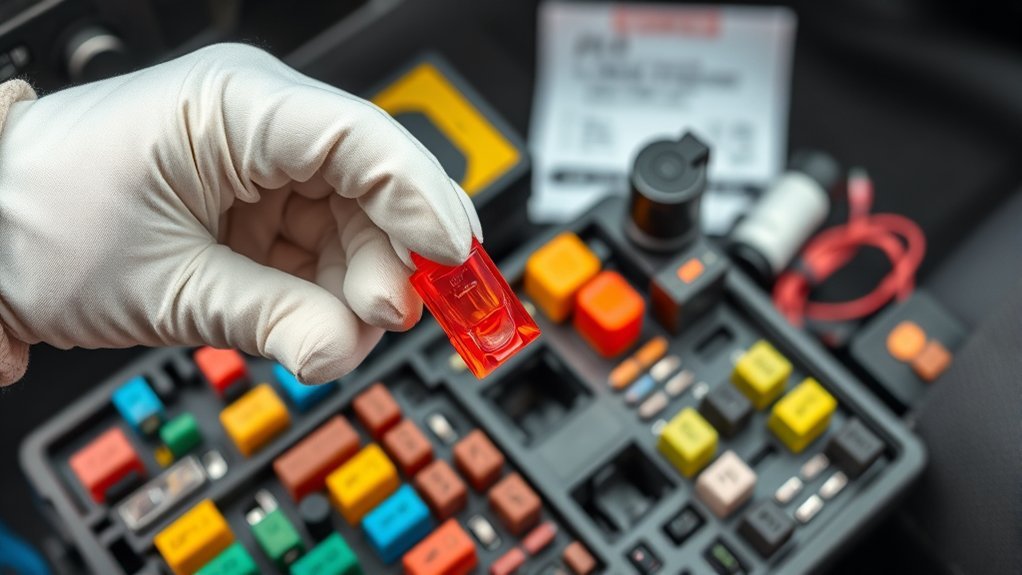
Choose the fuse based on how you want the dash cam to work. If you only want the camera to record while you drive, use a switched accessory fuse. This circuit gets power when the ignition turns on and loses power when the car shuts off.
If your dash cam needs parking mode, your hardwire kit may also need a constant fuse. A constant fuse keeps power available when the vehicle turns off. Use this only with a proper hardwire kit that includes battery protection.
[Products Worth Considering]

【Low Voltage Protection】Power cuts off automatically at 11.6V (23.2V for 24V input) to reserve engine-start power and safeguard your car battery.

DUAL-SLOT FUSE HOLDER: The dual-slot fuse jumper connector provides two fuse holders, one fuse holder to protect existing circuits and the second fuse holder to protect new circuits, making it safe and reliable to use in daily life
List of Package: This is a complete dash cam hardwire kit USB C with full accessories, including 1pc power cord with 9.68 feet length, 4pcs fuse tap with 16AWG specification, 4pcs 5A blade fuse and 1pc warp plate, you can use these kits to complete the wiring installation easily
Find a Switched Accessory Fuse
Use these steps to find a safe switched fuse:
- Read your owner’s manual and locate the interior fuse box diagram.
- Pick a non-critical circuit, such as a power outlet or accessory circuit, if your manual allows it.
- Test the fuse with the ignition off and confirm it has no power.
- Turn the ignition on and confirm the same fuse now has power.
This test helps you find a circuit that powers the dash cam while you drive and shuts it down when you park.
Test the Fuse Before You Connect Power
Use a circuit tester or multimeter before you install the fuse tap. Touch the tester to the exposed test points on the fuse. A switched fuse should read power with the ignition on and no power with the ignition off.
Test more than one fuse if needed. Do not guess based on the fuse label alone, because some circuits stay awake after the car turns off. Many modern cars keep accessory circuits active for several minutes.
Match the fuse tap direction to the live side of the fuse slot. This helps the new dash cam circuit pass through the added fuse instead of bypassing it.
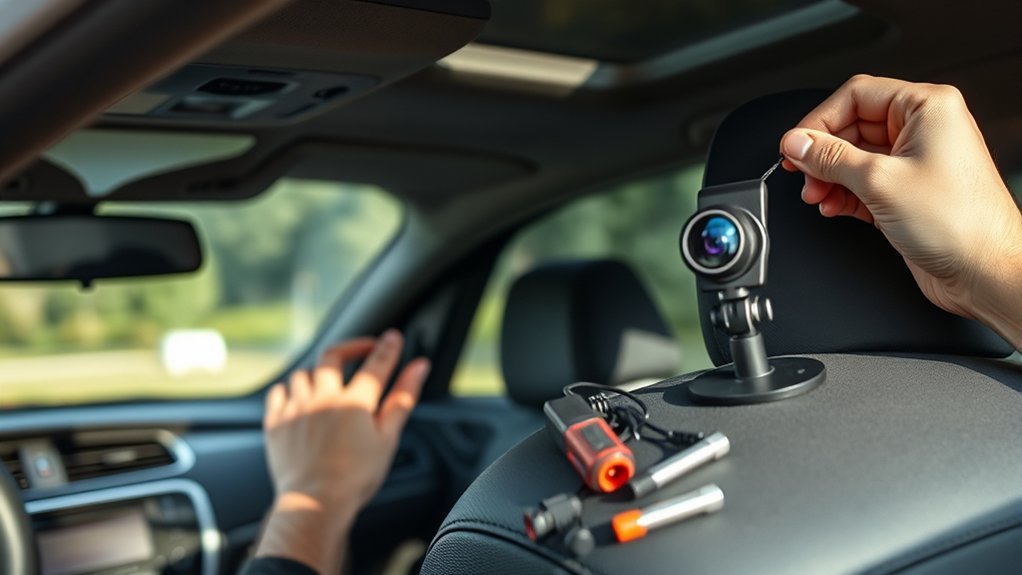
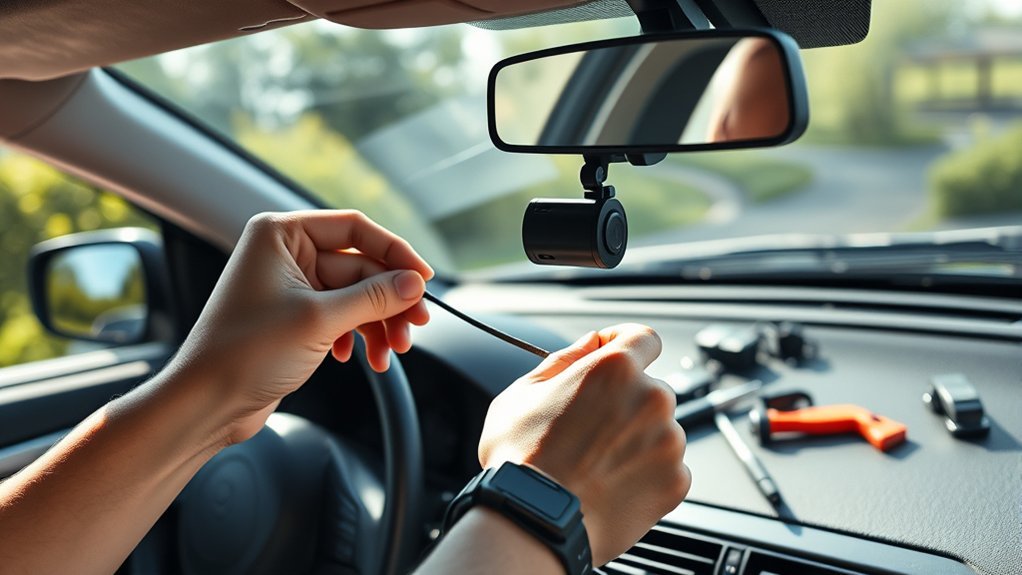
Connecting the Dash Cam Power Cable: A Detailed Process
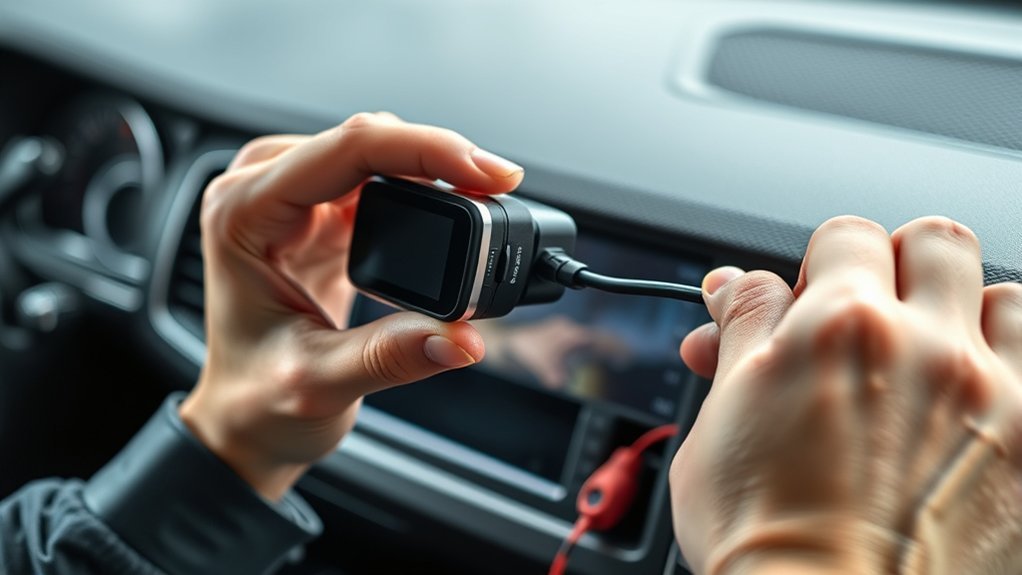
Connect the dash cam power cable only after you identify the correct fuses and ground point. Keep the vehicle off while you insert the fuse tap and make the wiring connections.
- Remove the chosen fuse with a fuse puller and place it into the lower slot of the fuse tap, unless your kit instructions say otherwise.
- Add the dash cam fuse to the second fuse tap slot using the amperage recommended by the hardwire kit maker.
- Insert the fuse tap into the original fuse slot and keep the cable pointed away from moving parts.
- Connect the accessory wire to the switched fuse lead if your kit uses a red ACC wire.
- Connect the constant wire to a constant fuse lead if your dash cam needs parking mode.
- Connect the ground wire to a clean metal chassis point before you test the camera.
Follow your kit’s wire color guide because brands can vary. If your guide conflicts with this article, follow the manufacturer’s instructions.
Routing Your Power Cable in the Car
Route the power cable from the dash cam to the fuse box before you lock the final connections in place. Start near the camera and tuck the cable into the headliner. Then guide it toward the A-pillar and down toward the fuse box.
Warning: Do not run the cable across an airbag path, because trim or wiring can interfere with airbag deployment during a crash.
The National Highway Traffic Safety Administration (NHTSA) explains that side-impact airbags can inflate very fast because drivers and passengers sit close to the striking object. Keep your wiring behind safe trim paths and away from any marked airbag area.
Use the rubber door seal and trim gaps only when they keep the wire secure and clear of airbags. If your A-pillar contains an airbag, check the service manual or ask an installer before you remove the trim.
Guide the cable behind interior panels so it does not hang near the pedals, steering column, or gear selector. Secure extra cable with zip ties after the system passes testing.
Grounding Your Dash Cam: Finding a Suitable Point
A poor ground can cause random shutdowns, flickering, or no power at all. Choose a metal screw or bolt connected to the vehicle chassis.
Use a clean metal grounding point so your dash cam gets a stable electrical path.
- Find a metal point near the fuse box, such as a factory bolt attached to the chassis.
- Check the surface and avoid paint, rust, plastic, or loose brackets.
- Attach the ground wire with a ring terminal or fork terminal if your kit includes one.
- Tighten the bolt so the terminal cannot move or rattle.
- Test continuity with a multimeter if you know how to use one safely.
Do not ground the dash cam to a random trim screw. Many trim screws attach only to plastic or thin brackets and may not provide a stable ground.
Testing Your Dash Cam Installation for Optimal Performance
Test the hardwiring process before you snap all trim pieces back into place. Turn the ignition on and confirm the dash cam powers up by itself. Then turn the ignition off and confirm the camera shuts down or enters parking mode, based on your settings.
Record a short test clip and play it back. Check the video angle, audio setting, date, time, and memory card status. Format the microSD card through the dash cam menu if the camera asks for it.
If your device includes parking mode, park the car and let the camera switch modes. Confirm the low-voltage cutoff setting in the hardwire kit or app. A higher cutoff setting protects the battery sooner but gives you less parking recording time.
Inspect the cable route after the test drive. Listen for rattles and check that the cable stays away from pedals, steering parts, and sharp trim edges.
Troubleshooting Hardwired Dash Cams
If your dash cam does not work after installation, check the simple items first. Most hardwire problems come from the fuse tap, ground point, cable route, or memory card.
- Check the fuse tap and make sure both fuses sit fully in the tap.
- Test the fuse slot with a multimeter and confirm it provides the power type you need.
- Check the ground and move it to clean bare metal if the camera loses power.
- Inspect the cable and look for pinched sections behind trim panels.
- Format the microSD card through the dash cam menu if recording stops or loops fail.
If parking mode fails, confirm that the constant power wire connects to a constant fuse. Also check the low-voltage cutoff setting. If the cutoff setting is high, the kit may shut the camera down sooner to protect the battery.
[Products Worth Considering]

This product is a special pressure drop line for driving data recorder.Through the step-down function of 12-24V voltage step-down output 5V1-3A current,power supply to the recorder

【Wide Compatible】Input:12V-24V; Output:5V/2A. With Type-C ports, this hardwire kit compatible with all of dash cams.

24/7 Parking Monitor: This power adapter system provides 24/7 parking surveillance, recording incidents like hit-and-runs, vandalism, or theft while your vehicle is off to protect your car and provide crucial evidence.
When to Get Professional Help
Hire a professional installer if your fuse box is hard to reach, your vehicle has complex trim, or you cannot identify safe fuse slots. You should also get help if you see airbag labels near the cable route.
Stop the install if you notice burning smells, blown fuses, warning lights, or a dash cam that powers on and off at random. These signs can point to a wrong fuse choice, weak ground, or damaged cable.
A professional install costs more, but it can protect your vehicle wiring and safety systems. It also saves time if you want front and rear cameras installed together.
Frequently Asked Questions
Is It Worth Hardwiring a Dash Cam?
Yes, hardwiring a dash cam can be worth it if you want a clean setup and parking mode. It hides the cable, frees your 12-volt outlet, and can give the camera more reliable power.
Use a proper hardwire kit with battery protection. This matters most if you park for long periods or use parking mode often.
Is Hardwiring a Dashcam Bad for the Battery?
Hardwiring is not bad for the battery when you install it correctly and use low-voltage cutoff. VIOFO, BlackVue, and 70mai all describe cutoff features that stop dash cam power when battery voltage drops too low.
Battery risk goes up if you use a cheap kit, skip the cutoff feature, or leave parking mode active for too long. Set the cutoff level with care if your vehicle sits unused for days.
Is It Better to Hardwire a Dash Cam or Cigarette Lighter?
Hardwiring works better if you want a hidden cable and parking mode. It also keeps the 12-volt outlet open for other devices.
A cigarette lighter plug works better if you want the easiest setup and do not need parking mode. It also lets you remove the dash cam faster when you change vehicles.
Can I Hardwire My Dash Cam to the Cigarette Lighter Fuse?
Yes, you can use the cigarette lighter fuse if it is a safe accessory circuit and it matches your power needs. Test it first because some outlets stay live after the ignition turns off.
A switched cigarette lighter fuse works well for normal driving recording. Parking mode usually needs a constant fuse plus a kit with low-voltage cutoff.
What Fuse Size Should I Use for a Dash Cam Hardwire Kit?
Use the fuse size recommended by your hardwire kit maker. Many dash cam kits use a low-amperage fuse, but you should not guess.
Keep the original vehicle fuse in the fuse tap for the factory circuit. Add the dash cam fuse in the correct slot for the new camera circuit.
Safety Disclaimer: This article is for informational purposes only and does not replace advice from a qualified vehicle electrician, mechanic, or installer. Always follow your owner’s manual and the dash cam manufacturer’s instructions before you work on vehicle wiring.
Conclusion
Hardwiring your dash cam gives you cleaner wiring, steadier power, and better support for parking mode. Start with the owner’s manual, choose safe fuse slots, and use a hardwire kit with low-voltage cutoff. Test every function before you close the trim panels. Once the setup works correctly, your dash cam can record with less cable clutter and more confidence on every drive.
References
- Hardwiring a Garmin Dash Cam Directly to a 12-Volt Power Source — Garmin Support, accessed 2026
- Parking Mode Cable Wiring Diagram — Garmin, accessed 2026
- 70mai Adjustable Hardwire Kit — 70mai, accessed 2026
- Battery Protection Features: Low Voltage Cutoff — BlackVue, accessed 2026
- Vehicle Air Bags and Injury Prevention — National Highway Traffic Safety Administration, accessed 2026