
To replace your Toyota Supra radiator, start by draining the coolant and disconnecting hoses. Remove the factory coolant temperature sensor and unscrew lower shroud clips. Carefully lift the old radiator out, then prepare your new Mishimoto radiator by confirming compatibility and adjusting rubber mounts. Install the new radiator, reassemble the fan shroud, and refill with a 50/50 mix of Toyota Red coolant and distilled water. Following these steps can help guarantee a smooth operation, and there’s more you should know to optimize your installation.
Essential Tools for Radiator Replacement in a Toyota Supra
When replacing the radiator in your Toyota Supra, having the right tools at your disposal is essential for a smooth and efficient process. First, grab a ratchet with an extension and a 10mm socket to remove the bolts securing the radiator. A flathead screwdriver will help with removing the lower shroud clips. You’ll also need pliers to loosen and detach the factory hose clamps, making it easier to remove the upper and lower coolant hoses.
For proper fitment of the new radiator, a utility knife or cut-off tool may be necessary to trim rubber mounts. A round file will allow you to notch the upper mount bolt holes for correct alignment behind the radiator support. Finally, keep a Lisle Coolant Funnel handy when filling the radiator; it simplifies the process and helps eliminate air pockets in the cooling system, ensuring peak performance.
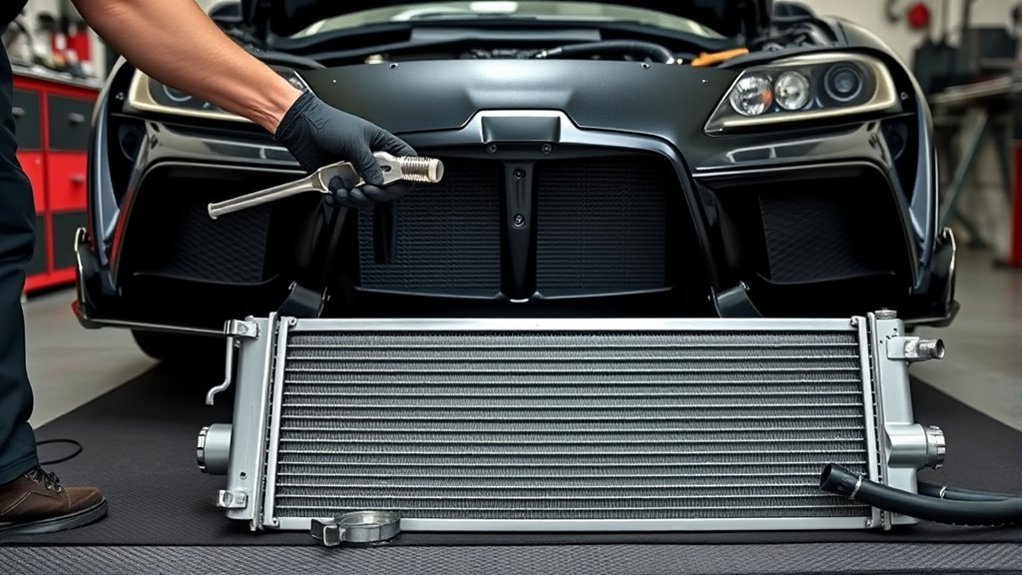
Step-by-Step Guide to Removing Your Old Radiator
With your tools ready, you can start the process of removing the old radiator from your Toyota Supra. Begin by draining the coolant through the radiator’s drain plug at the bottom. Disconnect the upper coolant hose and the overflow reservoir hose to guarantee complete drainage. Next, disconnect the factory coolant temperature sensor and remove the lower radiator hose to release the radiator from the cooling system.
Use a flathead screwdriver to remove the lower shroud clips, then unclip the two fan plugs. After that, take out the upper brackets using a 10mm socket. Carefully lift the radiator out of the engine bay, being mindful to avoid damaging any surrounding components. Finally, inspect the old radiator for signs of wear or damage. This thorough process guarantees a smooth shift for your new radiator installation.
Preparing Your New Mishimoto Radiator for Installation
Preparing your new Mishimoto radiator for installation involves several essential steps to guarantee a seamless fit and excellent performance. First, check that the radiator is compatible with your specific Toyota Supra model to avoid any fitment issues. Upon unboxing, inspect the radiator for damage or defects—dents or leaks can compromise performance.
Before diving into the installation process, gather the necessary tools:
- Ratchet with extension and 10mm socket
- Flathead screwdrivers
- Pliers for hose clamps
- Upper rubber mounts for height adjustment
- Installation manual for reference
Next, modify the upper rubber mounts as needed to achieve proper height alignment. Familiarize yourself with the radiator’s specific connection points and mounting locations to streamline the installation process. Taking these steps will guarantee a smooth shift to your new Mishimoto radiator, setting the stage for peak cooling performance.
Installing Your New Radiator: Key Steps and Tips
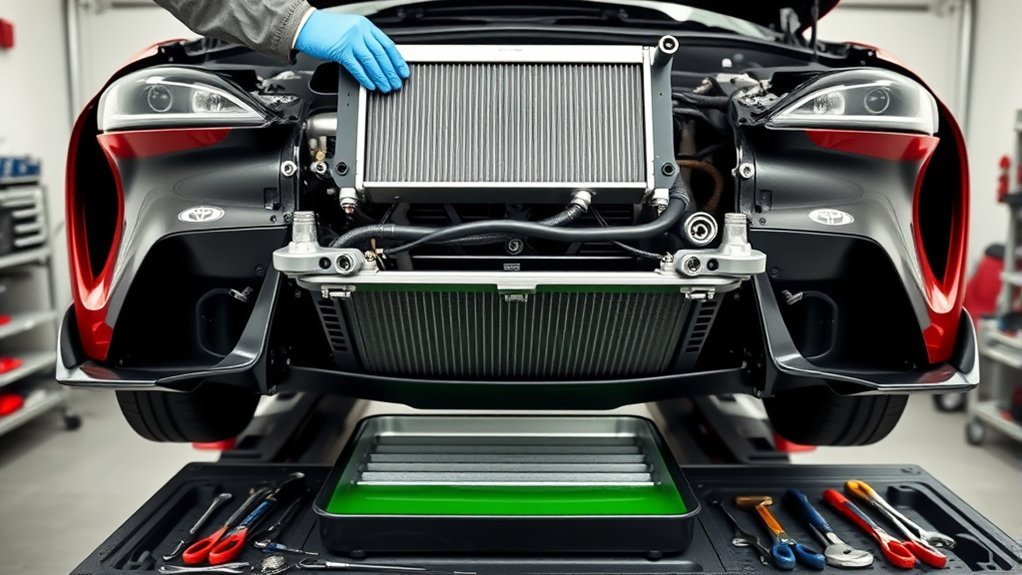
Now that your new Mishimoto radiator is ready for installation, you can begin the process by test fitting it in the engine bay. Adjust the upper rubber mounts to verify proper height and alignment with the radiator support. If necessary, notch the upper bracket holes to achieve the correct positioning behind the support, preventing misalignment.
Before securing the radiator, lightly grease the lower rubber mounts for easier fitting and stable placement. Reassemble the fan shroud, using the factory bolts in their original mounting points to guarantee proper airflow and cooling efficiency.
Once everything is in place, refill the radiator with a 50/50 mix of Toyota Red coolant and distilled water. Remember to monitor fluid levels closely and check for leaks as the engine warms up. This attention to detail will verify your new radiator operates efficiently and effectively.
Best Practices for Filling the Cooling System
When filling your Toyota Supra’s cooling system, always use a 50/50 mix of Toyota Red factory coolant and distilled water to guarantee peak performance. Employing effective air bleeding techniques is essential to eliminate trapped air, which can lead to overheating. Regularly monitor the coolant levels in both the radiator and overflow reservoir to confirm a proper fill and check for leaks after completing the process.
Proper Coolant Mixture Ratios
A proper coolant mixture is essential for the ideal performance of your Toyota Supra’s cooling system. Aim for a 50/50 blend of Toyota Red factory coolant and distilled water to optimize cooling efficiency and prevent corrosion. Here are some best practices:
- Always use distilled water to minimize mineral buildup.
- In hot climates, consider a 70/30 mixture (coolant to water) for enhanced cooling.
- Avoid using incompatible coolants like Dexcool, which can damage aluminum components.
- Monitor and adjust coolant levels within the first few days post-installation.
- Regularly check for leaks and maintain the proper coolant mixture for ongoing performance.
Sticking to these guidelines will help keep your Supra’s cooling system running smoothly and efficiently.
Effective Air Bleeding Techniques
Maintaining the right coolant mixture is just the beginning; properly filling the cooling system and eliminating air pockets is essential for peak performance. Start by setting the heater to full hot to guarantee coolant circulates through the heater core. Use a Lisle Coolant Funnel for efficient filling, minimizing air trapping. After filling, run the engine with the radiator cap off for several minutes, allowing trapped air to escape and closely monitor the coolant level, adding as needed. Watch the temperature gauge as the engine warms up, confirming the thermostat opens for better circulation. To further purge air, check for bubbles at the radiator filler neck and periodically squeeze the upper radiator hose. Implement these effective air bleeding techniques for best results.
Monitoring Coolant Levels Regularly
Regularly monitoring coolant levels is essential to prevent engine overheating and guarantee peak performance. Here are best practices for filling the cooling system:
- Check coolant levels in both the radiator and overflow reservoir every few weeks.
- Use a 50/50 mix of Toyota Red factory coolant and distilled water for ideal protection.
- Employ a Lisle Coolant Funnel to reduce air pockets during the filling process.
- After refilling, start the engine and keep the heater on high to help release trapped air.
- Recheck coolant levels after a few days of driving and top off if necessary.
Common Challenges in Radiator Replacement and Their Solutions
When replacing the radiator in your Toyota Supra, you might face misalignment during installation, especially with aftermarket parts. Ensuring the mounting points line up correctly is essential for a secure fit. Additionally, air pockets can form in the cooling system after refilling, so using a coolant funnel will help you bleed the system effectively.
Misalignment During Installation
Although misalignment during radiator installation can lead to significant issues, it’s often preventable with careful attention to detail. Follow these tips to guarantee a proper fit:
- Adjust the height of upper rubber mounts for compatibility with the new radiator.
- Notch the upper bracket holes to position the radiator correctly behind the support.
- Shave down lower rubber mounts for a snug fit that prevents movement.
- Always perform a test fit before securing the radiator to catch misalignment early.
- Confirm all mounting points align and connections are secure to avoid leaks and overheating.
Bleeding Air Pockets
After ensuring proper alignment during installation, the next critical step is bleeding air pockets from the cooling system. Start by setting the heater to maximum temperature while filling the system. Using a Lisle Coolant Funnel can help you maintain coolant levels and prevent air from being trapped. With the radiator cap off, start the engine to allow air bubbles to escape; keep an eye on the coolant level and add more until it stabilizes. Once the engine reaches operating temperature, squeeze the upper radiator hose to push any remaining air toward the radiator. Finally, monitor the coolant level in both the radiator and overflow reservoir over the next few days to confirm there are no lingering air pockets.
How to Keep Your New Radiator Running Smoothly
To guarantee your new radiator runs smoothly, regularly checking and maintaining coolant levels is essential. Make sure you’ve got a 50/50 mix of Toyota Red factory coolant and distilled water for peak performance.
- Flush the cooling system every 24 months to prevent contaminants.
- Monitor for leaks and signs of overheating; address issues immediately.
- Use a specialized coolant funnel, like the Lisle Coolant Funnel, to burp the system effectively.
- In hot climates, consider adding Water Wetter to your coolant mix for better cooling efficiency.
- Regularly inspect hoses and connections for wear or damage.
Frequently Asked Questions
How Do You Replace a Radiator Step by Step?
To replace a radiator, drain coolant, disconnect hoses, and remove the old unit. Install the new radiator, ensuring secure connections. Regular maintenance prevents issues, and choosing quality materials enhances durability and efficiency. Monitor for leaks afterward.
How Much to Replace a Toyota Radiator?
Replacing a Toyota radiator typically costs between $300 and $800, depending on replacement options. DIY expenses can lower costs, but professional services add labor fees, often ranging from $100 to $200, plus additional parts.
Can I Remove a Radiator by Myself?
Yes, you can remove a radiator by yourself. Gather the tools needed, like a ratchet and pliers. Follow radiator removal tips, take safety precautions, and guarantee a flat surface for a smooth DIY radiator replacement process.
Can You Swap a Radiator Without Draining the System?
You can’t swap a radiator without draining the system. For effective radiator maintenance, use DIY radiator tools, guarantee coolant system overview, and watch for radiator leak signs to prevent damage and guarantee peak performance.
Conclusion
So, you’ve just replaced your Toyota Supra’s radiator—congratulations! You’ve successfully navigated the treacherous waters of coolant and bolts, proving you’re the DIY hero of your own automotive saga. Just remember, if your new radiator starts leaking like a politician’s promise, don’t panic; it’s just your car’s way of keeping you on your toes. With regular maintenance and a little luck, you’ll keep that radiator running smoother than your last date’s excuses. Happy driving!


Leave a Reply