To diagnose a vacuum leak in your Toyota Supra, start with a visual inspection of hoses and connections for cracks and tears. Listen for hissing sounds around the intake manifold and throttle body. Use a vacuum gauge to check readings; normal levels are 17-20 inHg. If you notice a drop in readings, that’s a sign of a leak. Finally, scanning with an OBD-II scanner can reveal error codes to pinpoint issues. There’s more to uncover about effective diagnostics.
Understanding Vacuum Leaks in Your Toyota Supra
When you notice performance issues in your Toyota Supra, understanding vacuum leaks is vital, as they can considerably disrupt engine function. A vacuum leak occurs when unmetered air enters the intake manifold, affecting the air-fuel mixture and leading to common symptoms like rough idling or poor acceleration. To start diagnosing a vacuum leak, conduct a thorough visual inspection of the vacuum hoses, intake manifold gaskets, and throttle body seals for any signs of wear or damage. Listening for hissing or whistling sounds can also provide clues. Using a vacuum gauge can offer precise measurements, helping you pinpoint the leak’s location. Regular maintenance is essential to catch these leaks early, preventing more severe engine issues. By staying vigilant and proactive, you’ll maintain your Supra’s peak performance and liberate yourself from potential frustrations caused by vacuum leaks.
Common Symptoms of Vacuum Leaks You Should Notice
Noticing the common symptoms of vacuum leaks in your Toyota Supra can save you from further engine complications. Here are key indicators to keep an eye on:
- Rough Idling: If your engine struggles to maintain a steady RPM, it’s a sign of an inconsistent air-fuel mixture.
- Decreased Fuel Efficiency: Excess air entering the system can lead to an overly lean mixture, causing increased fuel consumption.
- Check Engine Light: If this light illuminates, it may indicate fault codes related to the vacuum system that require diagnostic checks.
- Hissing Sound: Unusual sounds, such as hissing or whistling, often signal a vacuum leak, especially noticeable when your engine is idling or under load.
Being vigilant about these symptoms can help you maintain peak engine performance and avoid costly repairs.
Visual Inspection: Checking Hoses and Connections
To effectively diagnose a vacuum leak in your Toyota Supra, a thorough visual inspection of hoses and connections is crucial. Begin by consulting the vacuum diagram specific to your model, familiarizing yourself with the layout of vacuum hoses. Carefully inspect all hoses for signs of wear, including cracks, tears, or any disconnections that could indicate potential leaks. Verify that all hose clamps are tight and secure, as loose connections can lead to unwanted air bypass. Pay particular attention to the intake manifold gasket and throttle body seals, as these areas are prone to leaks over time. While the engine runs, listen for hissing or whistling sounds, which often signal a vacuum leak in the vicinity of the inspected components. This meticulous approach will help you identify any issues early, preserving your Supra’s performance.
Tools Needed for Effective Leak Detection
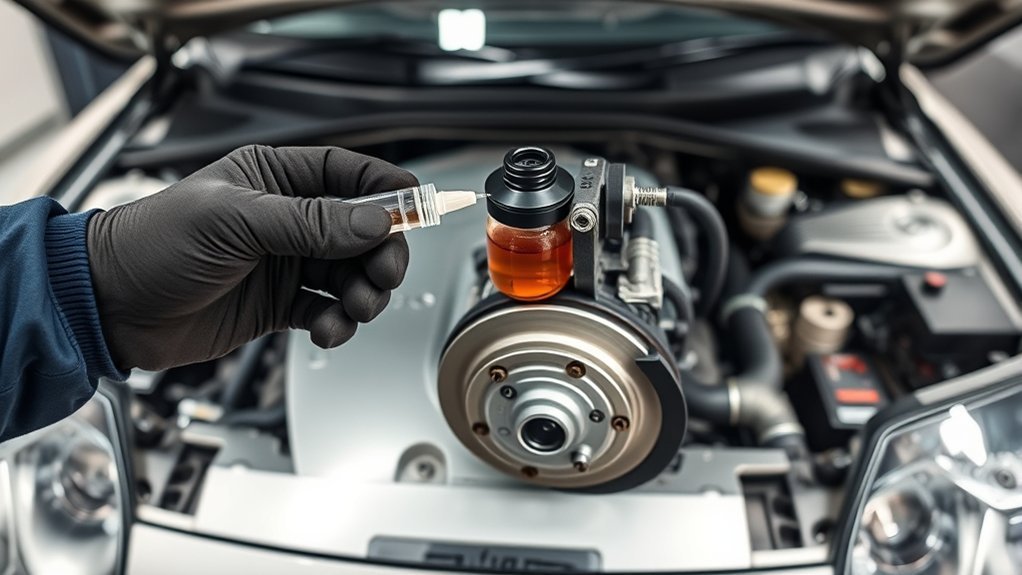
To effectively diagnose a vacuum leak in your Toyota Supra, you’ll need essential diagnostic equipment like a vacuum gauge and a smoke machine. Don’t forget safety gear to protect yourself while working, especially when using flammable substances. Common testing tools, such as carburetor cleaner and hose pliers, will aid in pinpointing the source of the leak with precision.
Essential Diagnostic Equipment
When diagnosing a vacuum leak in a Toyota Supra, having the right diagnostic equipment is essential for accurate and efficient detection. Here are four vital tools you’ll need:
- Vacuum Gauge: This tool measures engine vacuum levels, helping you identify leaks by comparing readings to standard values (17-20 inHg).
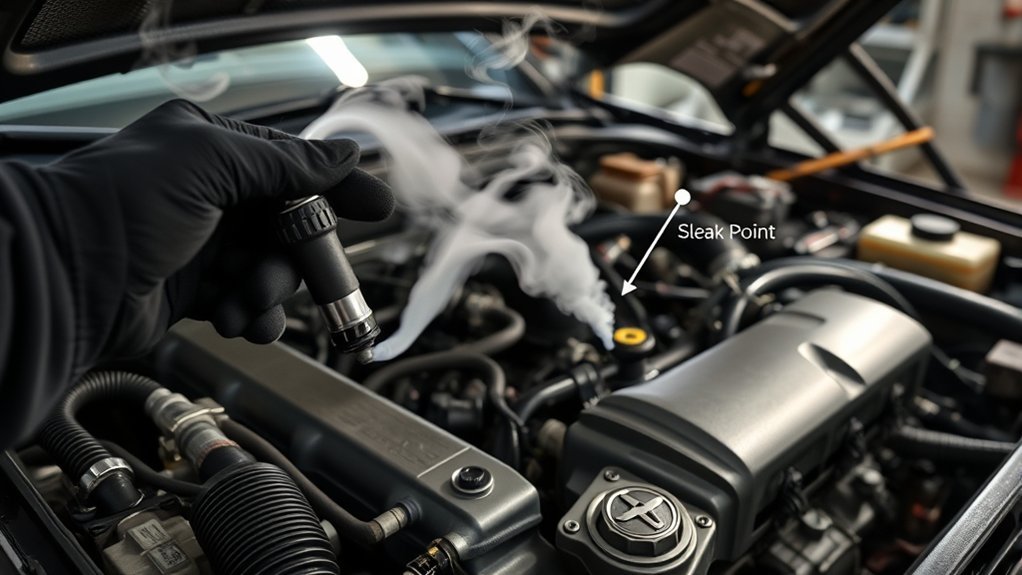
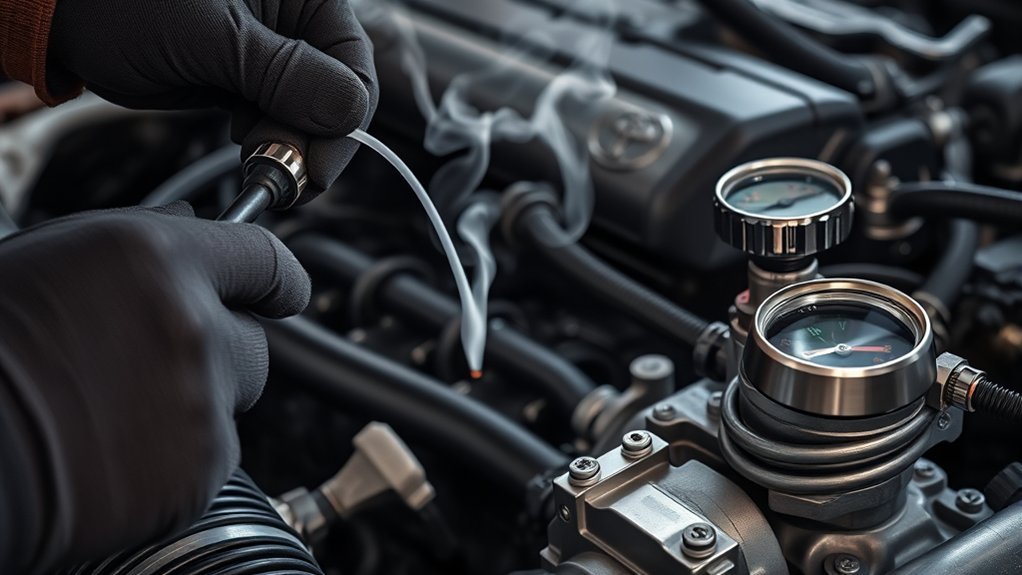
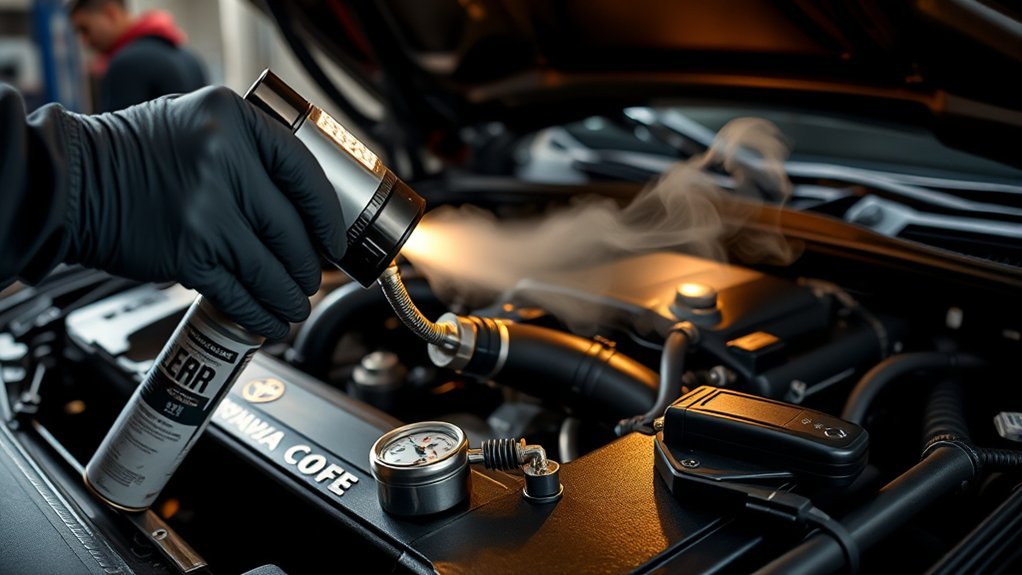
- Smoke Machine: It introduces smoke into the vacuum system, allowing you to visualize leaks in real-time.
- Carburetor Cleaner: Spray this around suspected leak areas; an increase in engine RPM indicates a vacuum leak, making it a quick diagnostic method.
- Flashlight: Essential for illuminating hard-to-see areas, helping you spot cracks, detached vacuum hoses, or faulty connections that could contribute to leaks.
With these tools, you’ll effectively tackle vacuum leak diagnostics.
Safety Gear Considerations
Diagnosing a vacuum leak effectively requires not just the right tools but also the appropriate safety gear. Always wear safety glasses and gloves to protect yourself from sharp engine components and hot surfaces. A vacuum tester gauge is vital for measuring vacuum levels accurately, while a smoke machine helps visualize leaks without exposing you to flammable substances. When conducting visual inspections, use a flashlight to illuminate hard-to-see areas and identify cracks or disconnections in hoses. If you must use carburetor cleaner or starting fluid, exercise caution and make sure you’re in full protective gear to mitigate any flammable risks. Prioritizing safety gear is essential for effective and secure diagnosis of vacuum issues in your Toyota Supra.
Common Testing Tools
Effective vacuum leak detection hinges on having the right tools at your disposal. To accurately diagnose leaks in your Toyota Supra, gather the following essential tools:
- Vacuum Tester Gauge: Use this to measure vacuum pressure, ensuring levels stay between 17 and 20 inches of mercury (inHg).
- Brake Cleaner or Spray: Apply this to suspected leak areas. An increase in engine RPM will indicate a leak.
- Smoke Machine: This tool allows for visual inspection, filling the vacuum system with smoke to reveal escape points.
- Hose Pliers: Essential for manipulating vacuum hoses without damage during inspection or replacement.
With these tools, you’ll enhance your leak detection capabilities, ensuring your engine runs efficiently.
Listening for Hissing Sounds: How to Diagnose Vacuum Leaks
Listening for hissing sounds is essential in identifying vacuum leaks in your Toyota Supra, as these noises often signal an underlying issue. Start the engine and carefully focus on the engine bay, particularly around vacuum hoses, the intake manifold, and gaskets—common sources of leaks. If you detect a hissing sound, move closer to suspected areas to pinpoint its location while ensuring your safety around moving parts. Pay attention to any changes in engine idle speed or behavior, as these can further confirm the existence of a vacuum leak. For more accurate detection in hard-to-reach areas, utilize a stethoscope or a length of hose as a listening device. By honing your listening skills, you can effectively diagnose vacuum leaks, leading to better engine performance and efficiency. Awareness of these sounds is your key to liberation from potential engine issues.
Using Spray Tests for Leak Detection
When using spray tests for leak detection on your Toyota Supra, focus on essential techniques like targeting common leak points with carburetor or brake cleaner. Always prioritize safety by keeping flammable substances away from the engine and having a fire extinguisher nearby. As you spray, watch for changes in engine RPM to accurately interpret the presence of a vacuum leak.
Essential Spray Test Techniques
One reliable method for diagnosing vacuum leaks in your Toyota Supra is the spray test, which utilizes a flammable aerosol like carburetor cleaner or brake cleaner. To effectively detect vacuum leaks, follow these essential techniques:
- Identify Suspected Areas: Focus on vacuum hoses, intake manifold gaskets, and throttle body seals.
- Apply Spray: With the engine running, spray the aerosol around these areas.
- Monitor Engine RPM: If there’s a leak, you’ll notice an increase in engine RPM as the spray is inhaled.
- Listen for Sounds: Pay attention for hissing sounds that indicate the precise location of the leak.
After completing the spray test, clean the area to guarantee accurate future diagnostics.
Safety Precautions During Testing
To guarantee your safety while conducting spray tests for vacuum leak detection in your Toyota Supra, it’s crucial to follow certain precautions. Always wear safety goggles and gloves to shield your eyes and skin from potential irritation caused by flammable substances. Make sure the engine is at operating temperature; this enhances accuracy in detecting vacuum leaks as you observe changes in engine RPM. Opt for a non-flammable aerosol, like carburetor or brake cleaner, to minimize fire hazards. Apply the spray in small amounts around suspected leak areas, carefully listening for RPM increases indicating vacuum leaks. Finally, maintain a safe distance from moving parts and hot surfaces, and avoid using large quantities of flammable materials to reduce explosion risks.
Interpreting Engine Response Changes
As you conduct spray tests for vacuum leak detection in your Toyota Supra, interpreting engine response changes is essential for accurate diagnosis. Pay close attention to how the engine reacts during the test, as these changes can pinpoint the leak’s location. Here are key points to take into account:
- Engine Speed Increase: A rise in RPM indicates air from a vacuum leak.
- Common Leak Points: Focus on vacuum hoses, gaskets, and the throttle body.
- Controlled Spray Application: Use small amounts of spray to avoid flooding the engine.
- Operating Temperature: Confirm the engine is warm for reliable results.
Testing With a Vacuum Gauge: What You Need to Know
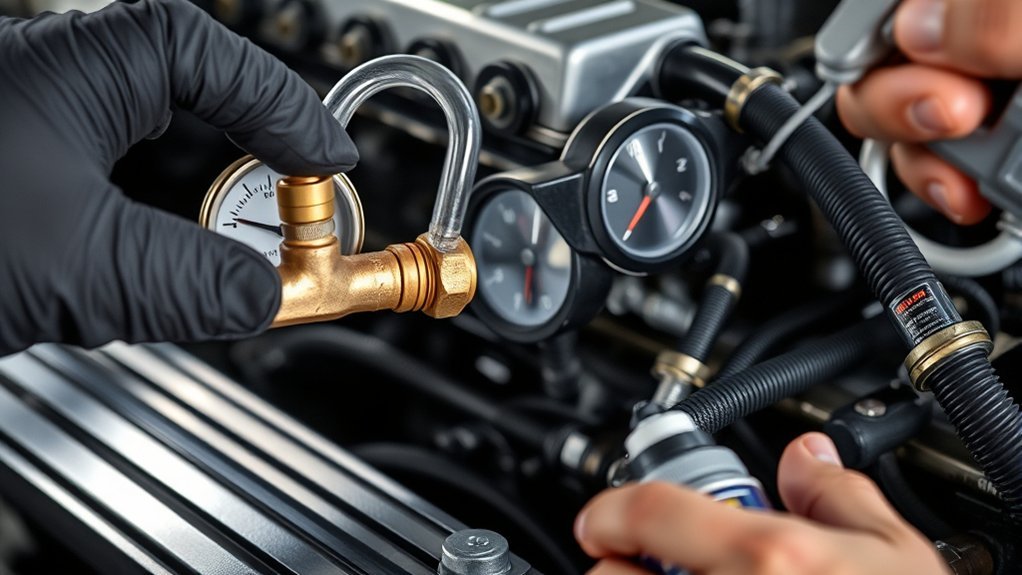
While diagnosing a vacuum leak in your Toyota Supra, using a vacuum gauge is an effective method to assess engine performance. To get started, connect the vacuum gauge to the intake manifold and run the engine. Monitor the vacuum pressure, as this will help you diagnose potential issues.
| Vacuum Reading | Indication |
|---|---|
| 17-20 inHg | Normal engine function |
| Below 17 inHg | Possible vacuum leak |
| Consistently high | Potential valve problems or airflow restrictions |
| Fluctuating pressure | Signs of a leak or irregular engine operation |
Low readings may suggest a vacuum leak, while fluctuating pressure could indicate further complications. Always consult your vehicle’s service manual for specific vacuum gauge testing procedures and acceptable pressure ranges tailored to your Supra. This precision is key to effective diagnostics.
Using an OBD-II Scanner to Check for Troubles
Using an OBD-II scanner is essential for diagnosing vacuum leaks in your Toyota Supra. Start by checking error codes, such as P0171 and P0174, which indicate lean fuel mixtures caused by excess air. Next, analyze live data for engine RPM and fuel trim percentages, and remember to reset the engine light after confirming repairs to guarantee all systems are functioning correctly.
Checking Error Codes
How can you effectively diagnose a vacuum leak in your Toyota Supra? Start by using an OBD-II scanner to connect to the diagnostic port under the dashboard. This lets you access the vehicle’s onboard computer system to identify potential issues. Follow these steps:
- Check for trouble codes that indicate a vacuum leak, such as lean fuel mixture or misfire codes.
- Record any error codes and their definitions for deeper insight into the affected areas.
- Clear the error codes to monitor if they reappear, indicating persistent problems.
- Regularly scan for codes to maintain peak engine performance and catch issues early.
When the check engine light comes on, these steps can help you diagnose and address the vacuum leak effectively.
Analyzing Live Data
To effectively diagnose a vacuum leak in your Toyota Supra, analyzing live data from an OBD-II scanner is essential. Start by monitoring real-time engine parameters, focusing on fuel trim values. A high positive fuel trim indicates the engine’s compensation for excess air, often due to a vacuum leak. Compare short-term and long-term fuel trims; significant discrepancies can reveal an imbalance affecting the air-fuel mixture. Additionally, keep an eye on engine RPM; unstable idling or fluctuating RPM readings while stationary are red flags for a vacuum leak. Finally, check for Diagnostic Trouble Codes (DTCs) related to lean conditions or airflow issues, as these often signal the presence of a vacuum leak requiring immediate repair.
Resetting Engine Light
Before you reset the engine light on your Toyota Supra, it’s essential to connect an OBD-II scanner to the vehicle’s diagnostic port, usually found under the dashboard near the steering column. Follow these steps to guarantee a thorough process:
- Retrieve Diagnostic Trouble Codes: Use the scanner to check for any codes indicating a vacuum leak.
- Address Identified Issues: Fix any problems related to the vacuum leak before proceeding.
- Clear Stored Codes: Select the option on the scanner to reset the check engine light.
- Test Drive: Finally, take your Supra for a test drive to confirm that the issue is resolved and the light doesn’t reappear, guaranteeing ideal vehicle performance.
Is It Time to Call a Mechanic for Vacuum Leak Repairs?
When symptoms like rough idling, decreased fuel efficiency, or a check engine light appear, it’s essential to evaluate whether it’s time to call a mechanic for vacuum leak repairs. A professional can effectively diagnose issues that may elude your DIY efforts. Mechanics utilize specialized tools, such as smoke machines and OBD-II scanners, to detect vacuum leaks that aren’t visible. If your attempts with carburetor cleaner or listening for hissing sounds haven’t worked, consulting an expert can prevent further engine damage. Additionally, a mechanic can perform a pressure test on the vacuum system, providing a detailed analysis of any leaks affecting engine performance. Regular maintenance or diagnostics from a professional not only helps identify vacuum leaks early but also improves fuel economy and reduces long-term repair costs. Don’t hesitate; addressing these symptoms promptly can lead to a smoother, more efficient driving experience.
Conclusion: Ensuring Your Toyota Supra Runs Smoothly
Ensuring your Toyota Supra runs smoothly requires vigilant attention to its vacuum system, as even minor leaks can greatly impact performance. To maintain ideal engine performance and fuel efficiency, follow these key steps:
Vigilantly monitor your Toyota Supra’s vacuum system to prevent minor leaks from affecting performance and fuel efficiency.
- Regular Maintenance: Inspect vacuum hoses and gaskets for wear or damage to prevent vacuum leaks.
- Utilize Diagnostics: Employ a smoke machine during diagnostics to reveal hidden vacuum leaks in the intake system.
- Monitor Performance Metrics: Keep an eye on RPM stability; early detection of vacuum leaks can lead to prompt repairs.
- Replace Components: Use high-quality, heat-resistant materials when replacing old or cracked vacuum components for enhanced durability.
Frequently Asked Questions
Can You Use WD-40 to Check for Vacuum Leaks?
Yes, you can use WD-40 to check for vacuum leaks, but its effectiveness is limited. Consider safer alternatives like soap water or professional diagnostic tools. Always prioritize safety precautions to avoid engine performance issues and hazards.
What Can I Spray to Check for Vacuum Leaks?
To check for vacuum leaks, use spray methods like carb cleaner or brake cleaner, or apply a soap solution for bubbling. Propane detection and water misting can also reveal leaks, ensuring your engine performs at its best.
Where Are Common Places to Find Vacuum Leaks?
You’ll commonly find vacuum leaks around the intake manifold, throttle body, and vacuum hoses. Check the brake booster, PCV valve, air filters, and fuel injectors for signs of wear or improper sealing.
How to Perform a Vacuum Test?
To perform a vacuum test, connect your vacuum test equipment to the manifold. Interpret vacuum readings—steady indicates health, fluctuations reveal leaks. Identify leak sources using common test methods for effective troubleshooting and understand the importance of vacuum integrity.
Conclusion
To summarize, addressing vacuum leaks in your Toyota Supra isn’t just about maintaining performance; it’s about preserving the thrill of the drive. By systematically diagnosing and fixing these leaks, you guarantee your engine runs smoothly and efficiently. Remember, a well-tuned Supra isn’t just a car; it’s an experience. So, don’t let a small leak spoil your journey—take the steps to keep your ride in top shape and enjoy every twist and turn on the road ahead.